Facebook Pixel
In this article, we will be walking you through setting up your LeadQuizzes and Facebook Pixel Integration.
Part 1: What can you do with Facebook Pixel Integration
Part 2: Setting up your Facebook Pixel in LeadQuizzes
Part 3: Configuring your Facebook Pixel Event & Parameters
Part 4: Verifying Facebook Pixel Events using Pixel Helper
Part 5: Creating conversion tracking
Part 1: What can you do with Facebook Pixel Integration
With LeadQuizzes' Facebook Pixel Integration you can create powerful Facebook ad campaigns including the following:
- Setup conversion tracking
- Facebook custom audiences & retargeting campaigns based on; quiz result, answers selected, drop-off points & button clicks.
- Remove your lead capture form and instead, pixel a custom audience based on their actions.
- Setup personalized ad campaigns and reduce cost per lead, while increasing conversions.
Part 2: Setting up your Facebook Pixel in LeadQuizzes
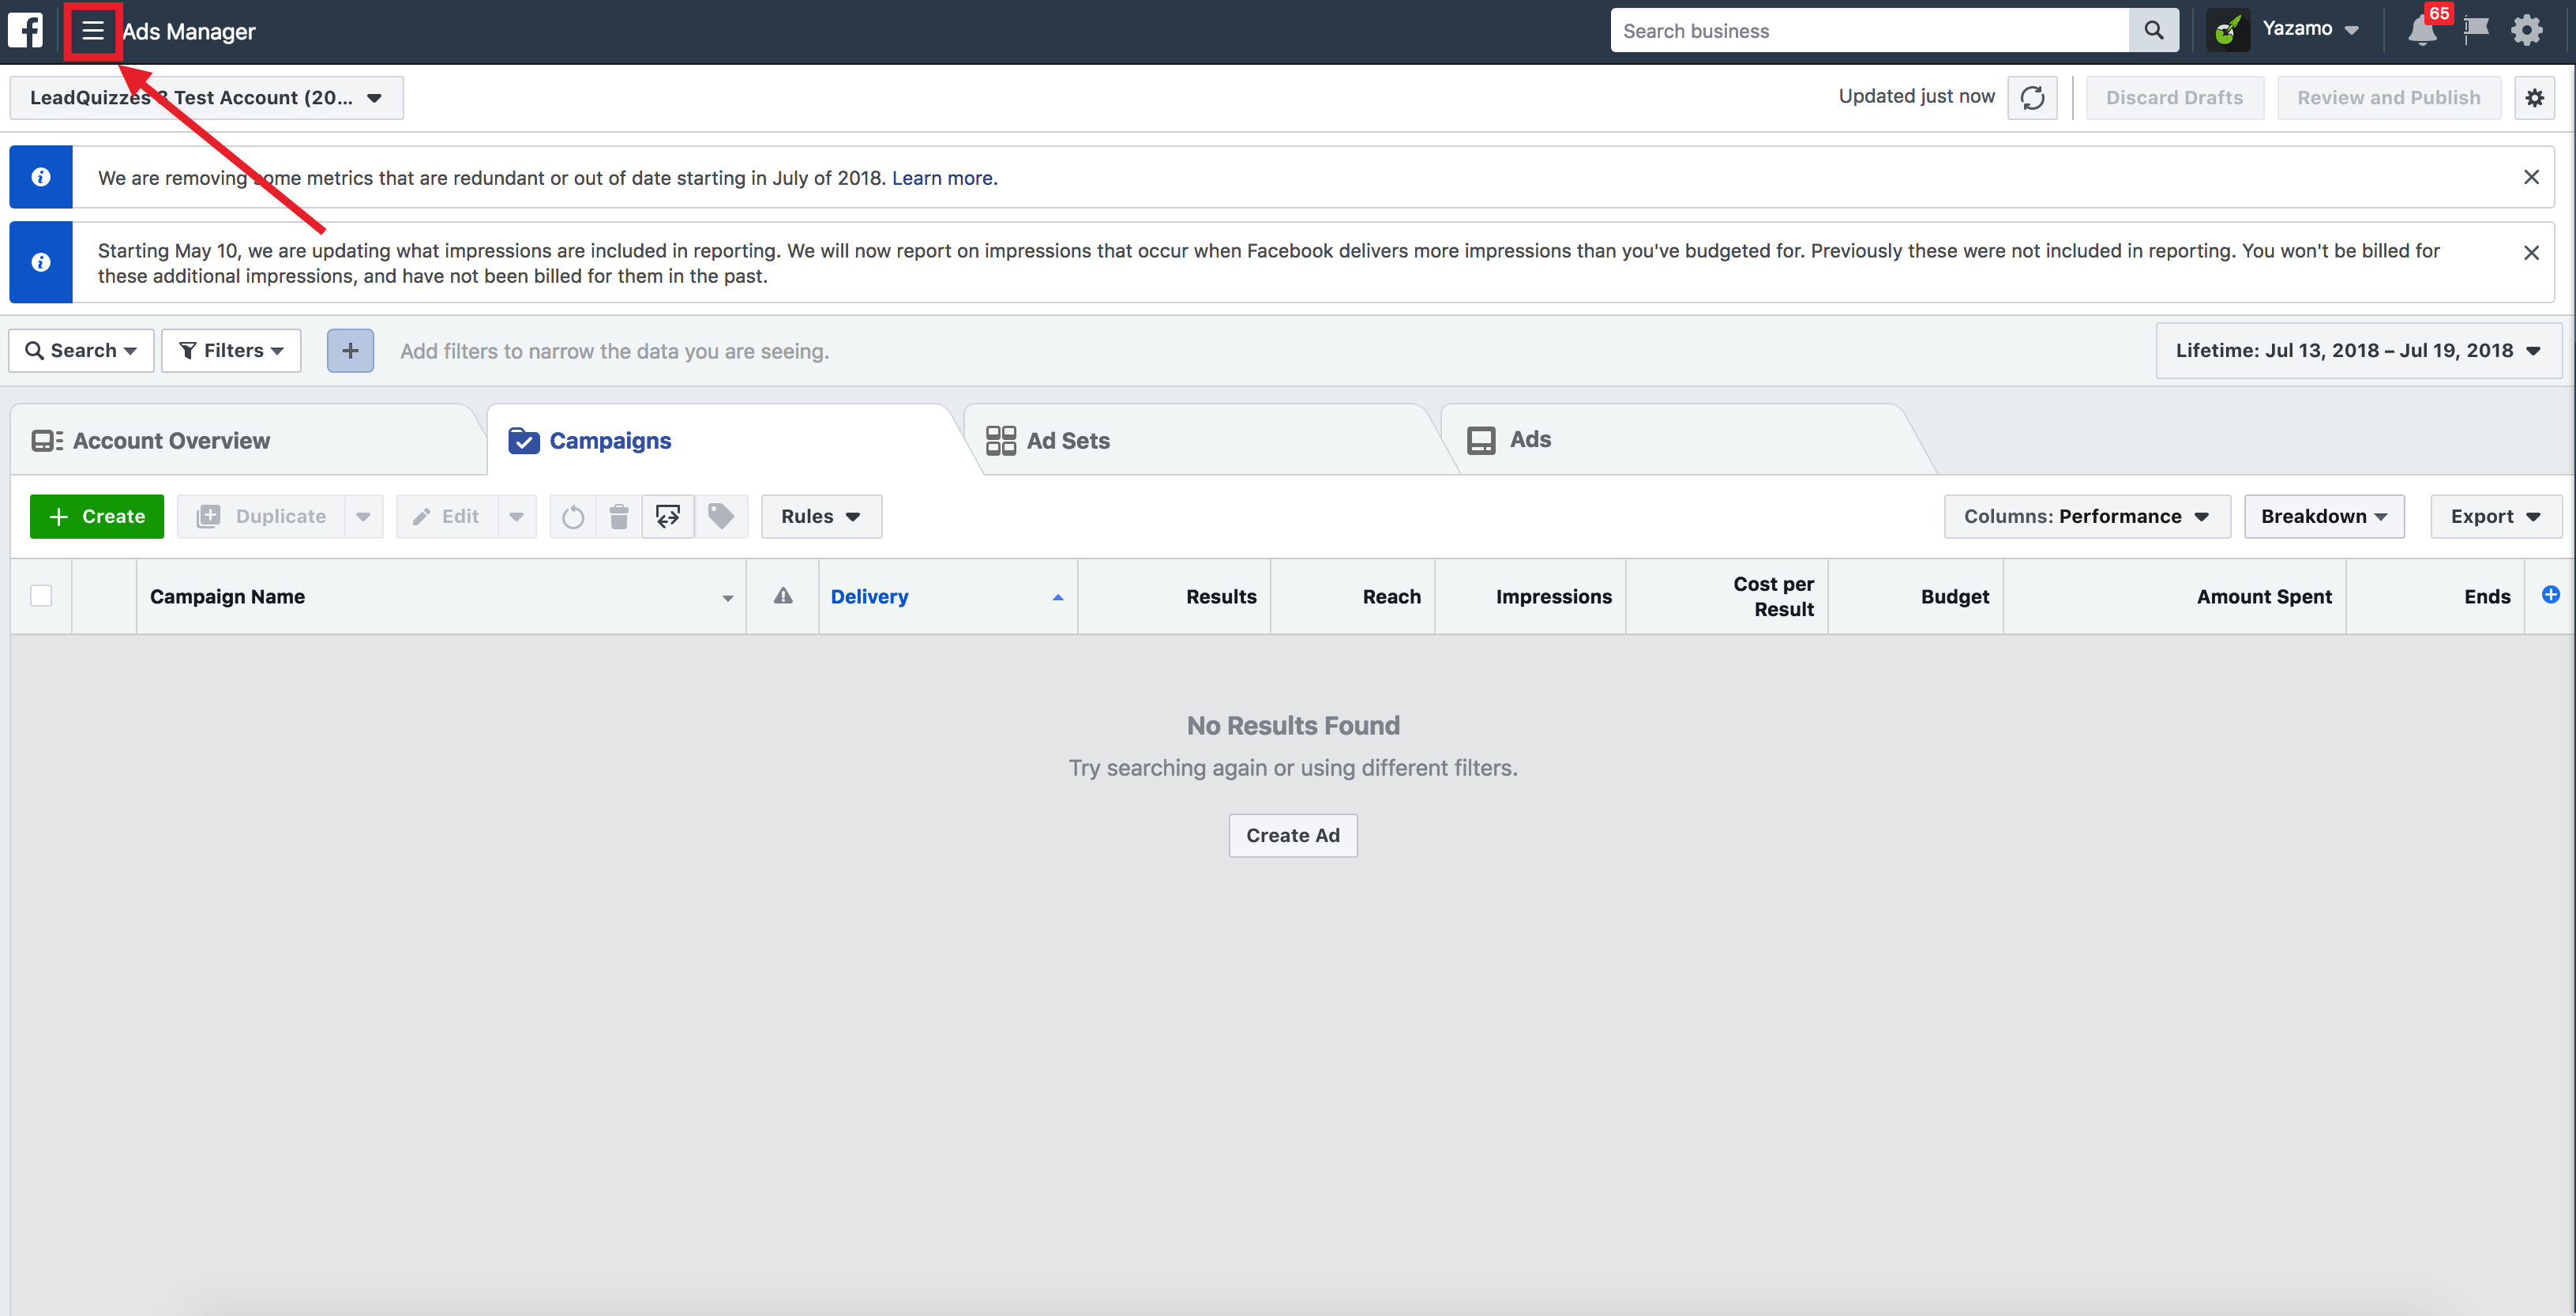
1. Start your Facebook Pixel setup with LeadQuizzes by clicking on the top left-hand menu inside of your Facebook Ads Manager.
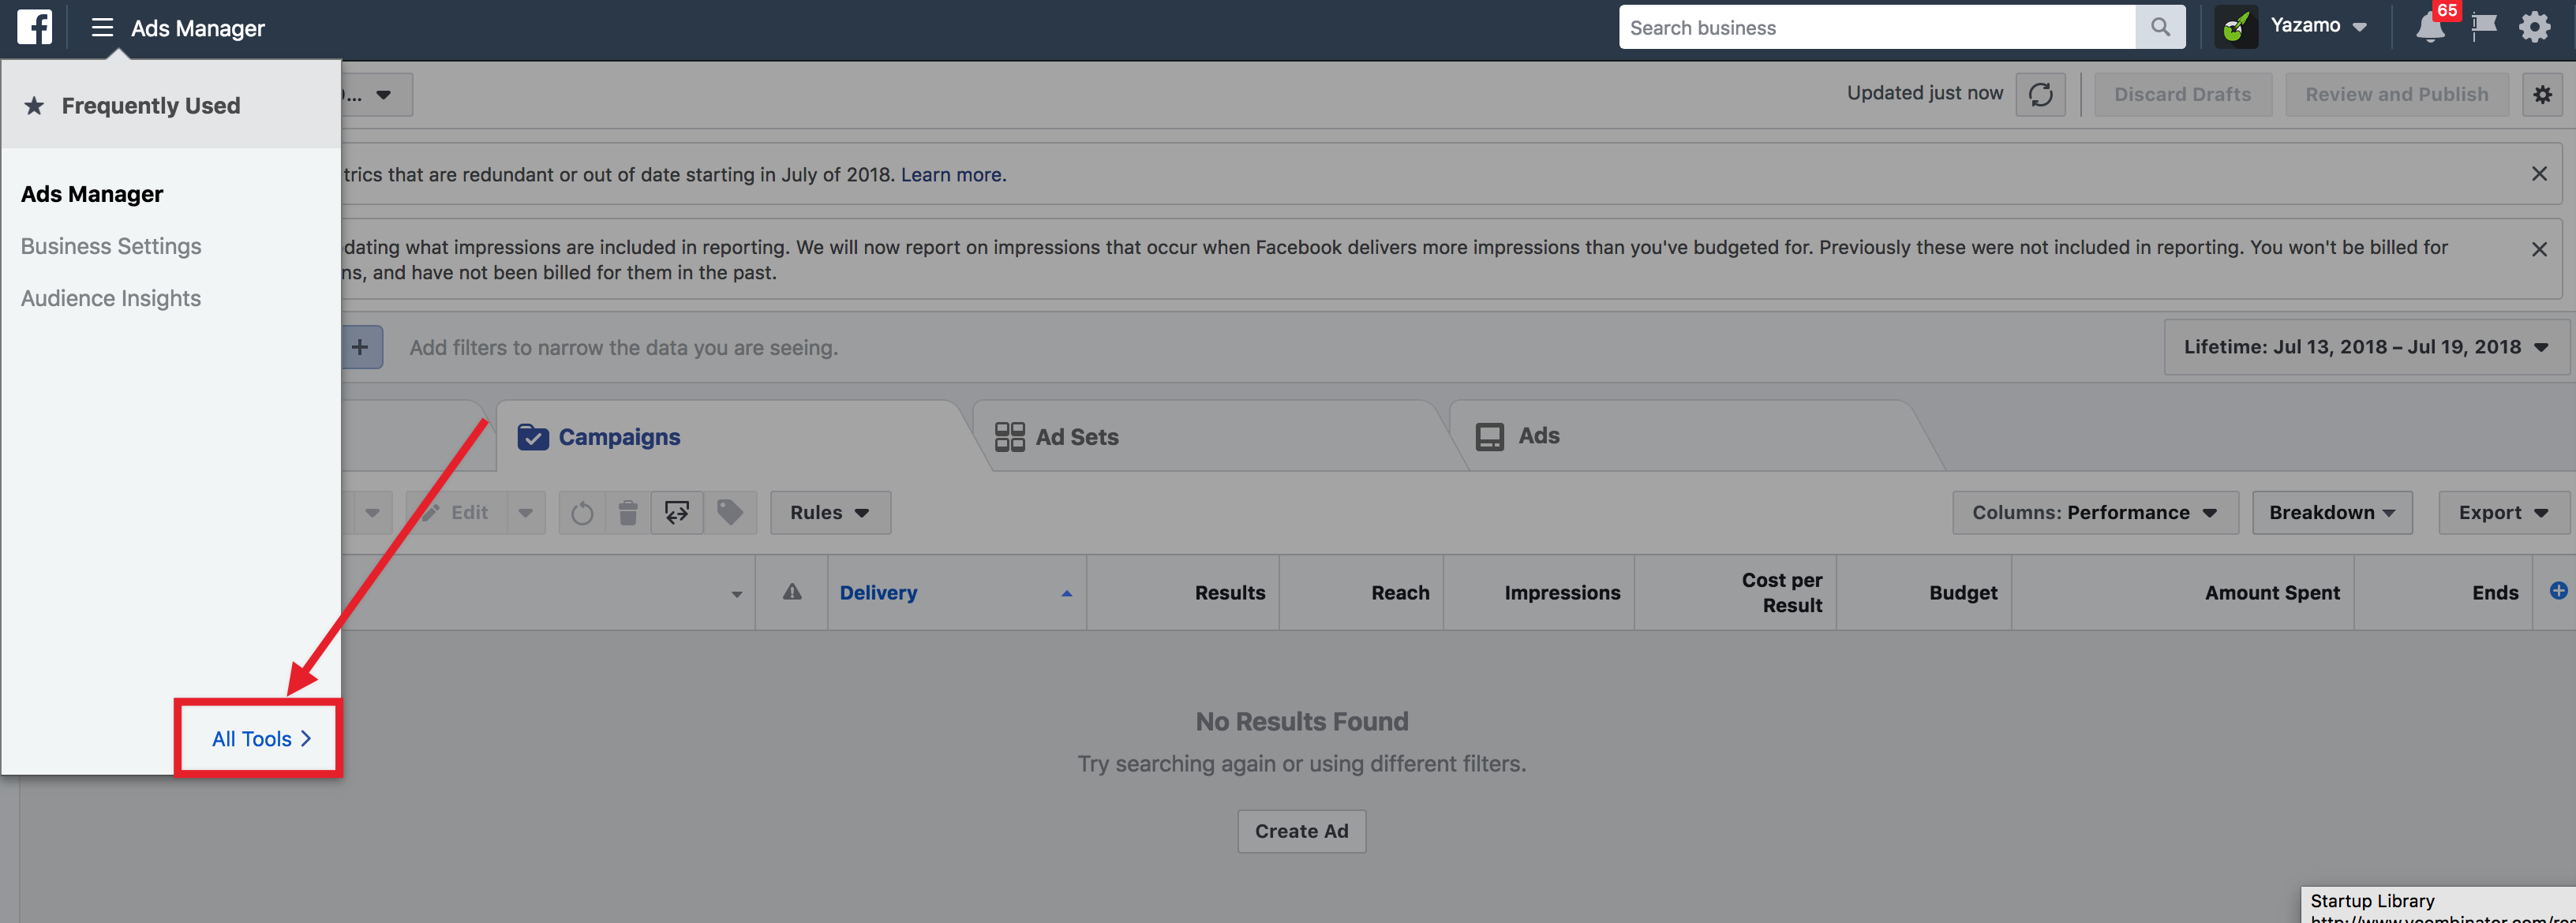
2. Next Click "All tools" at the bottom right-hand corner of the menu list
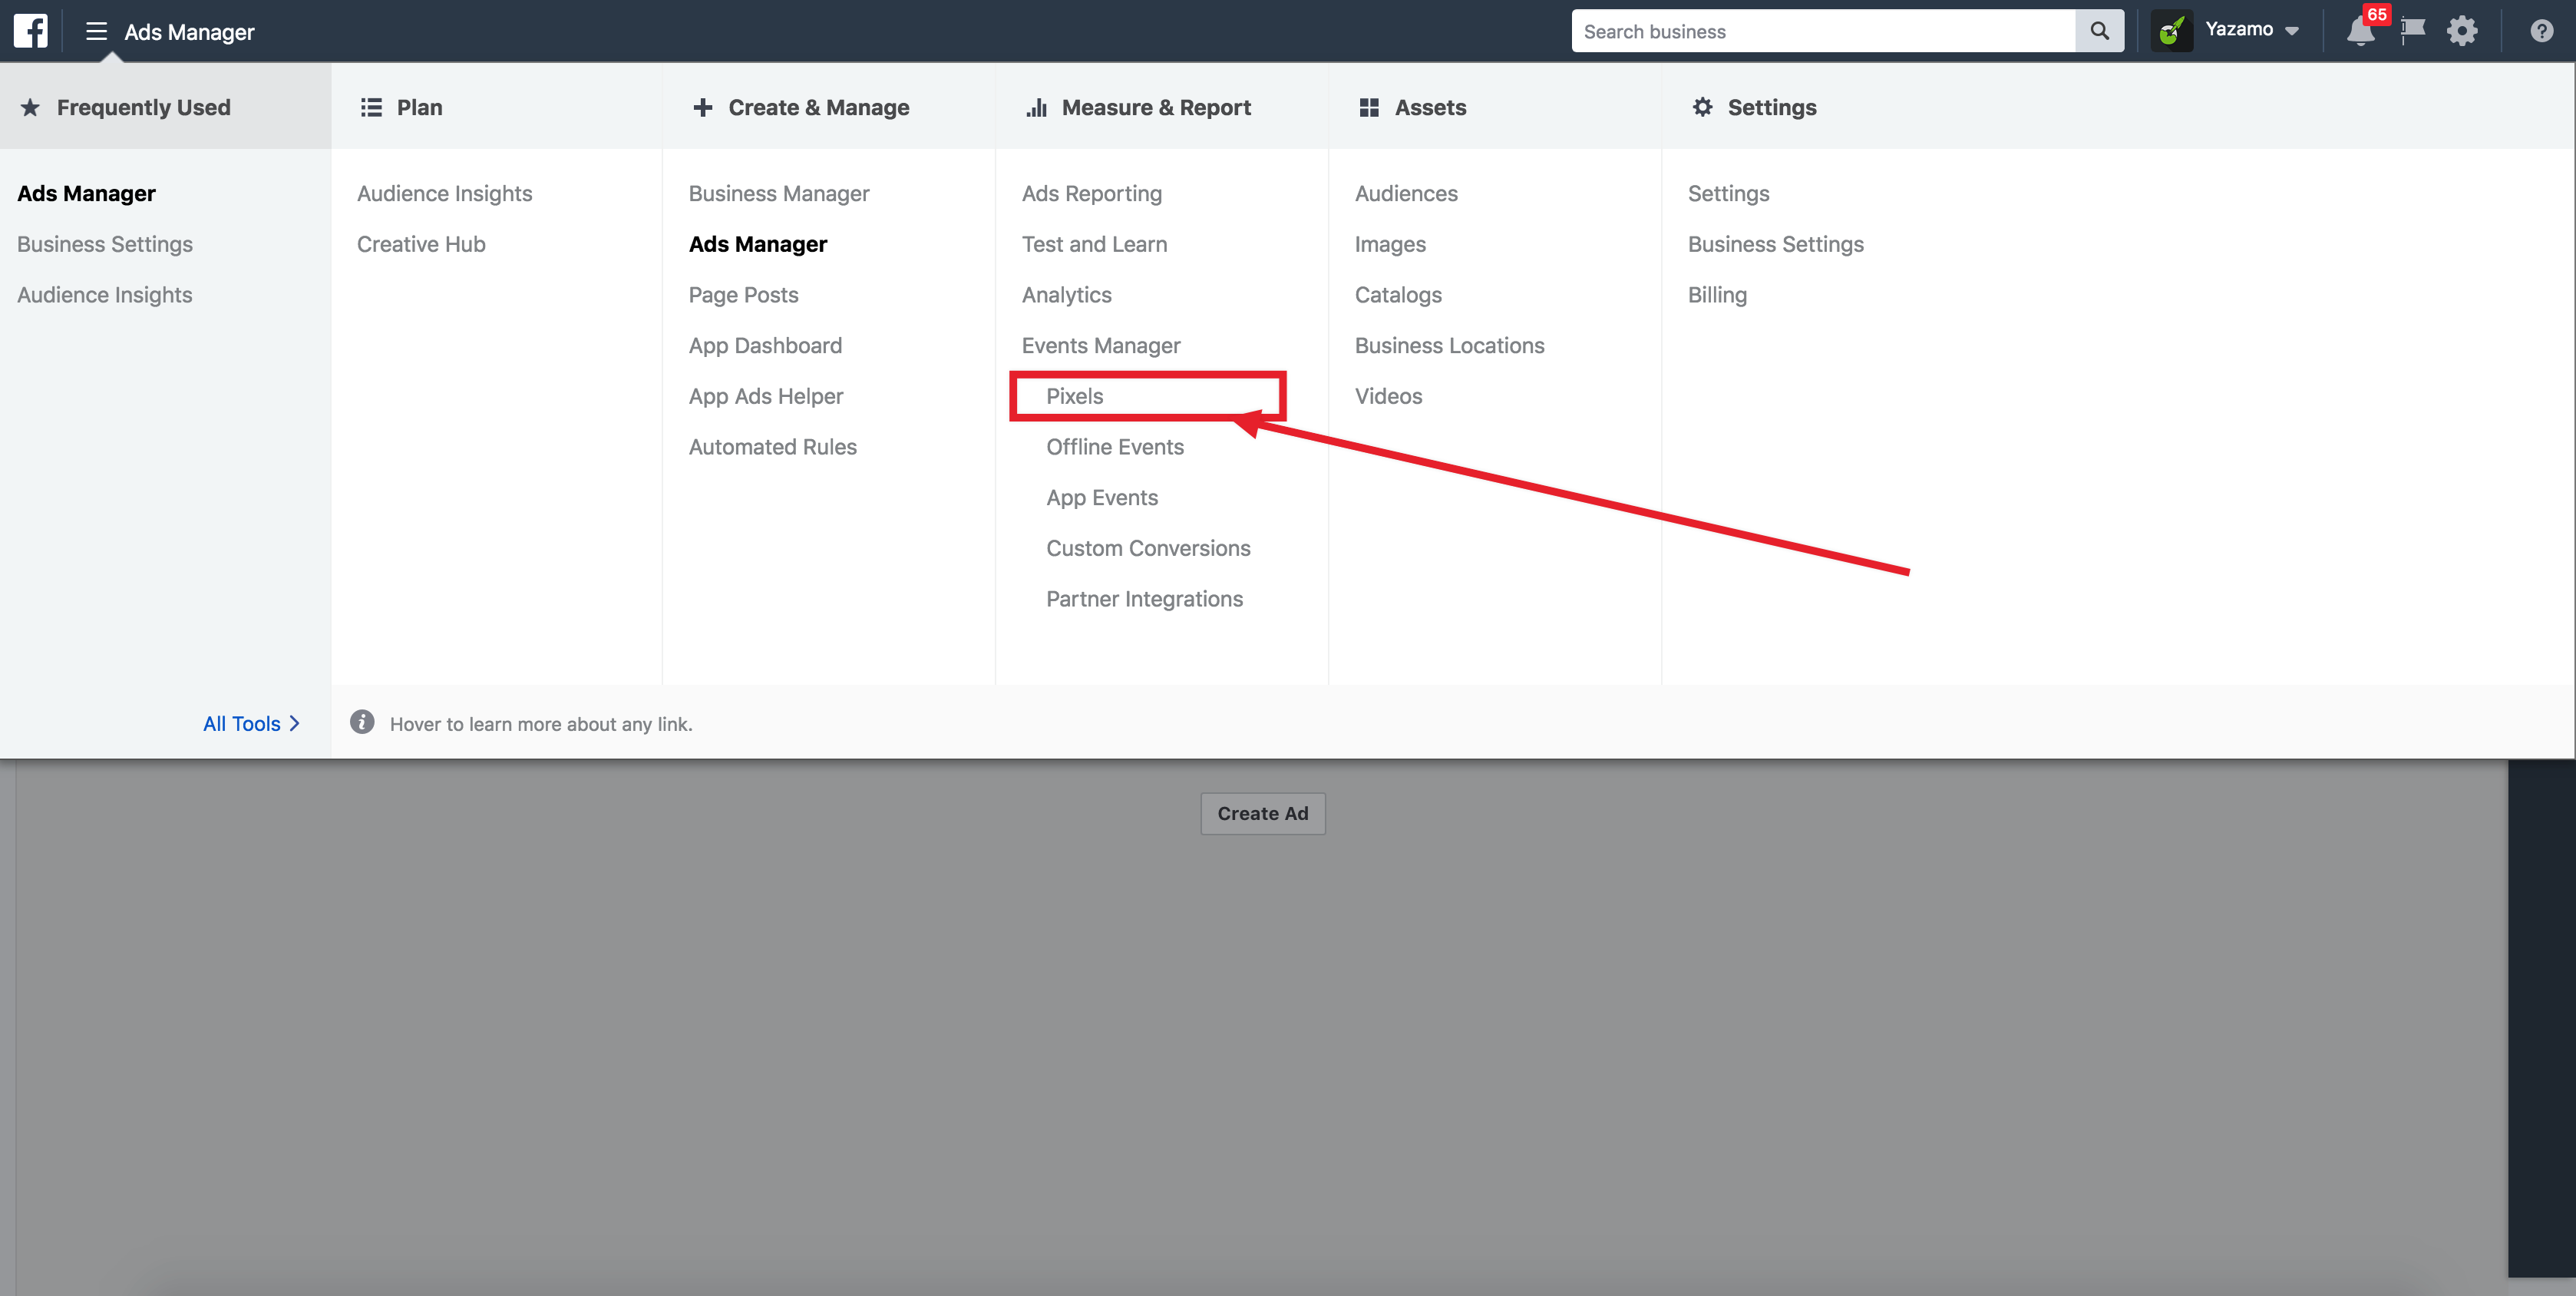
3. Once the menu has expanded, click "Pixels" under Measure & Report list.
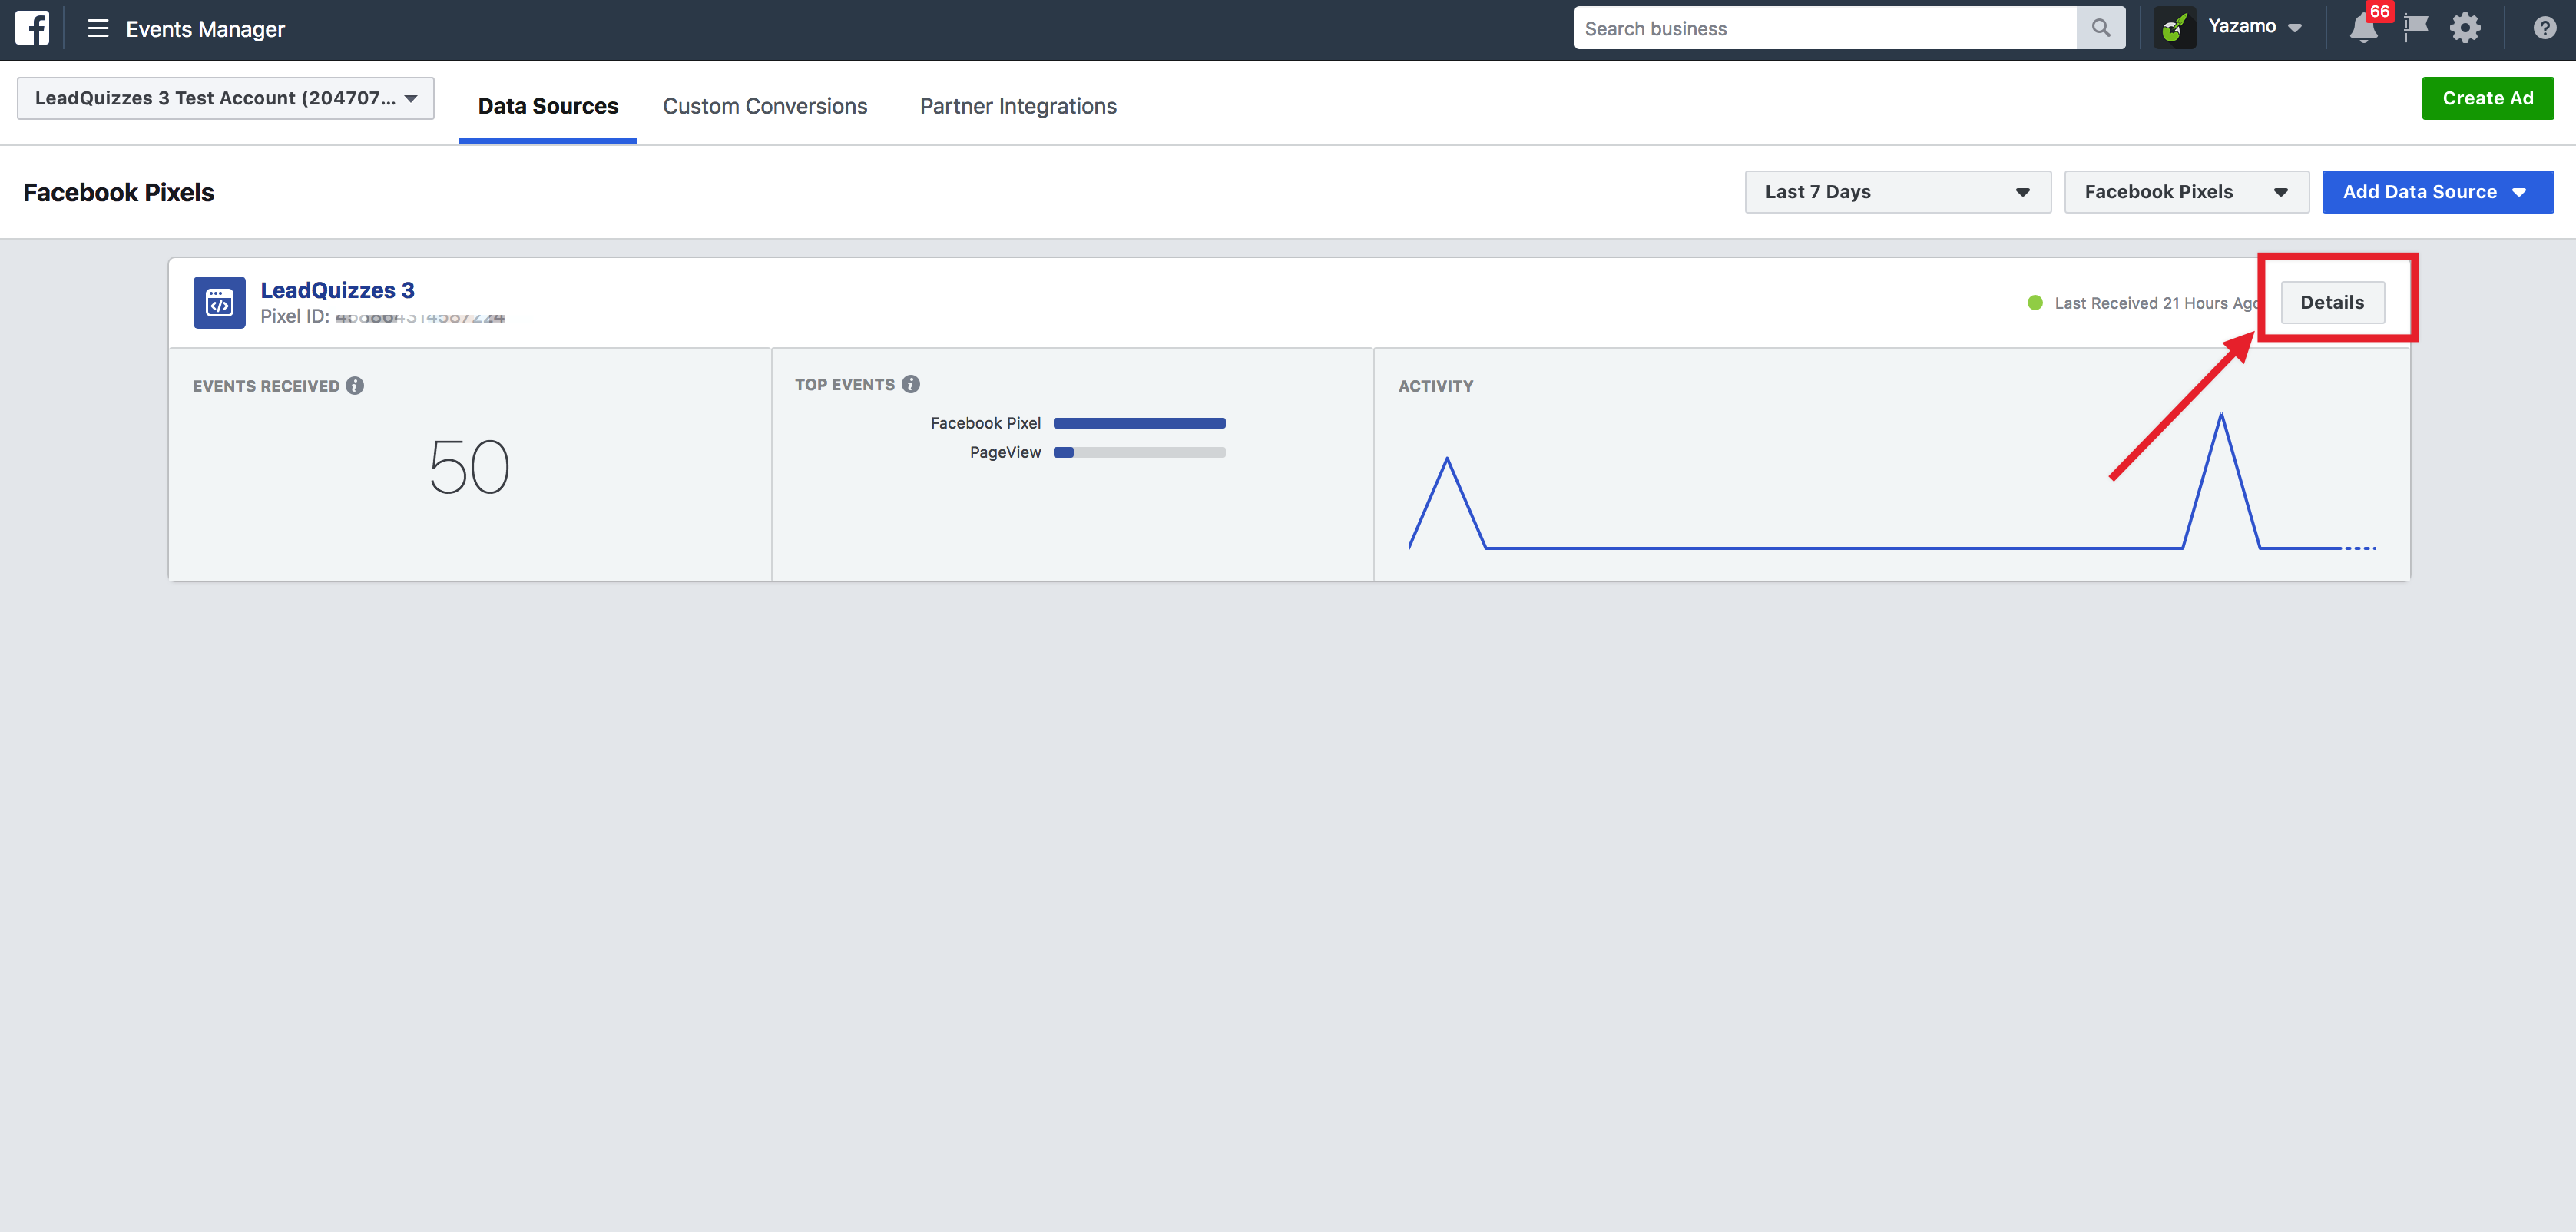
4. After clicking "Pixels," you will be redirected to the Facebook Pixels dashboard. If this is your first time setting up a Facebook Pixel in your Ads Manager, Facebook will prompt you to setup your Facebook Pixel. If you have already created a Facebook Pixels in your Ads Manager, you will see a list of pixels in the Facebook Pixels dashboard.
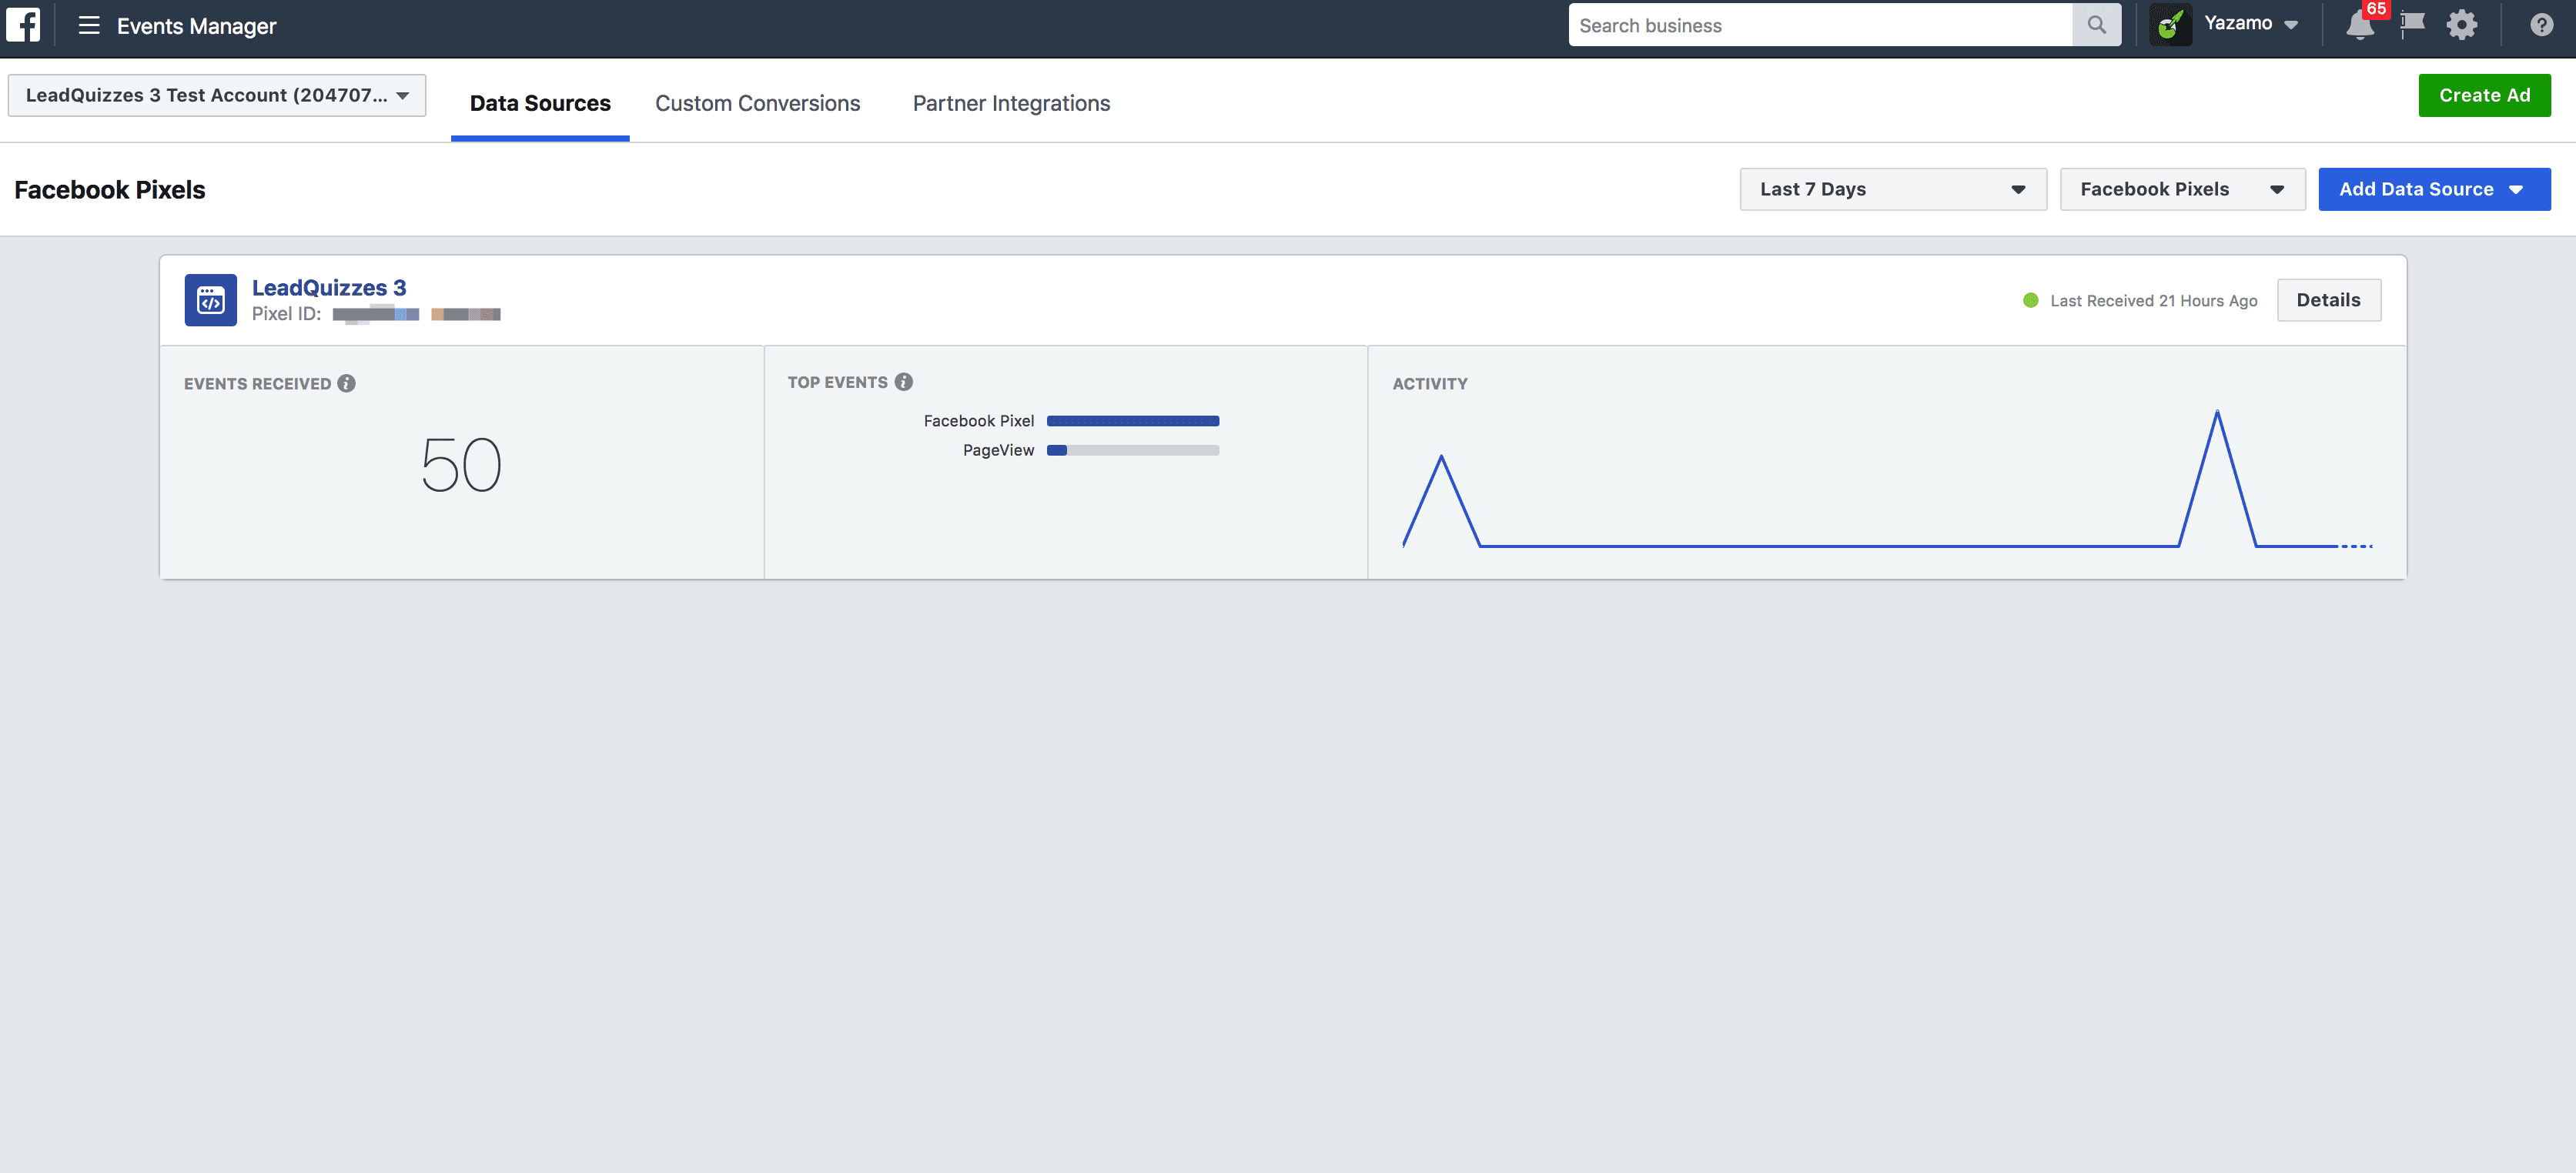
5. Now select the Facebook Pixel you would like to use with LeadQuizzes by clicking " Details" on the top right-hand corner of your pixel.
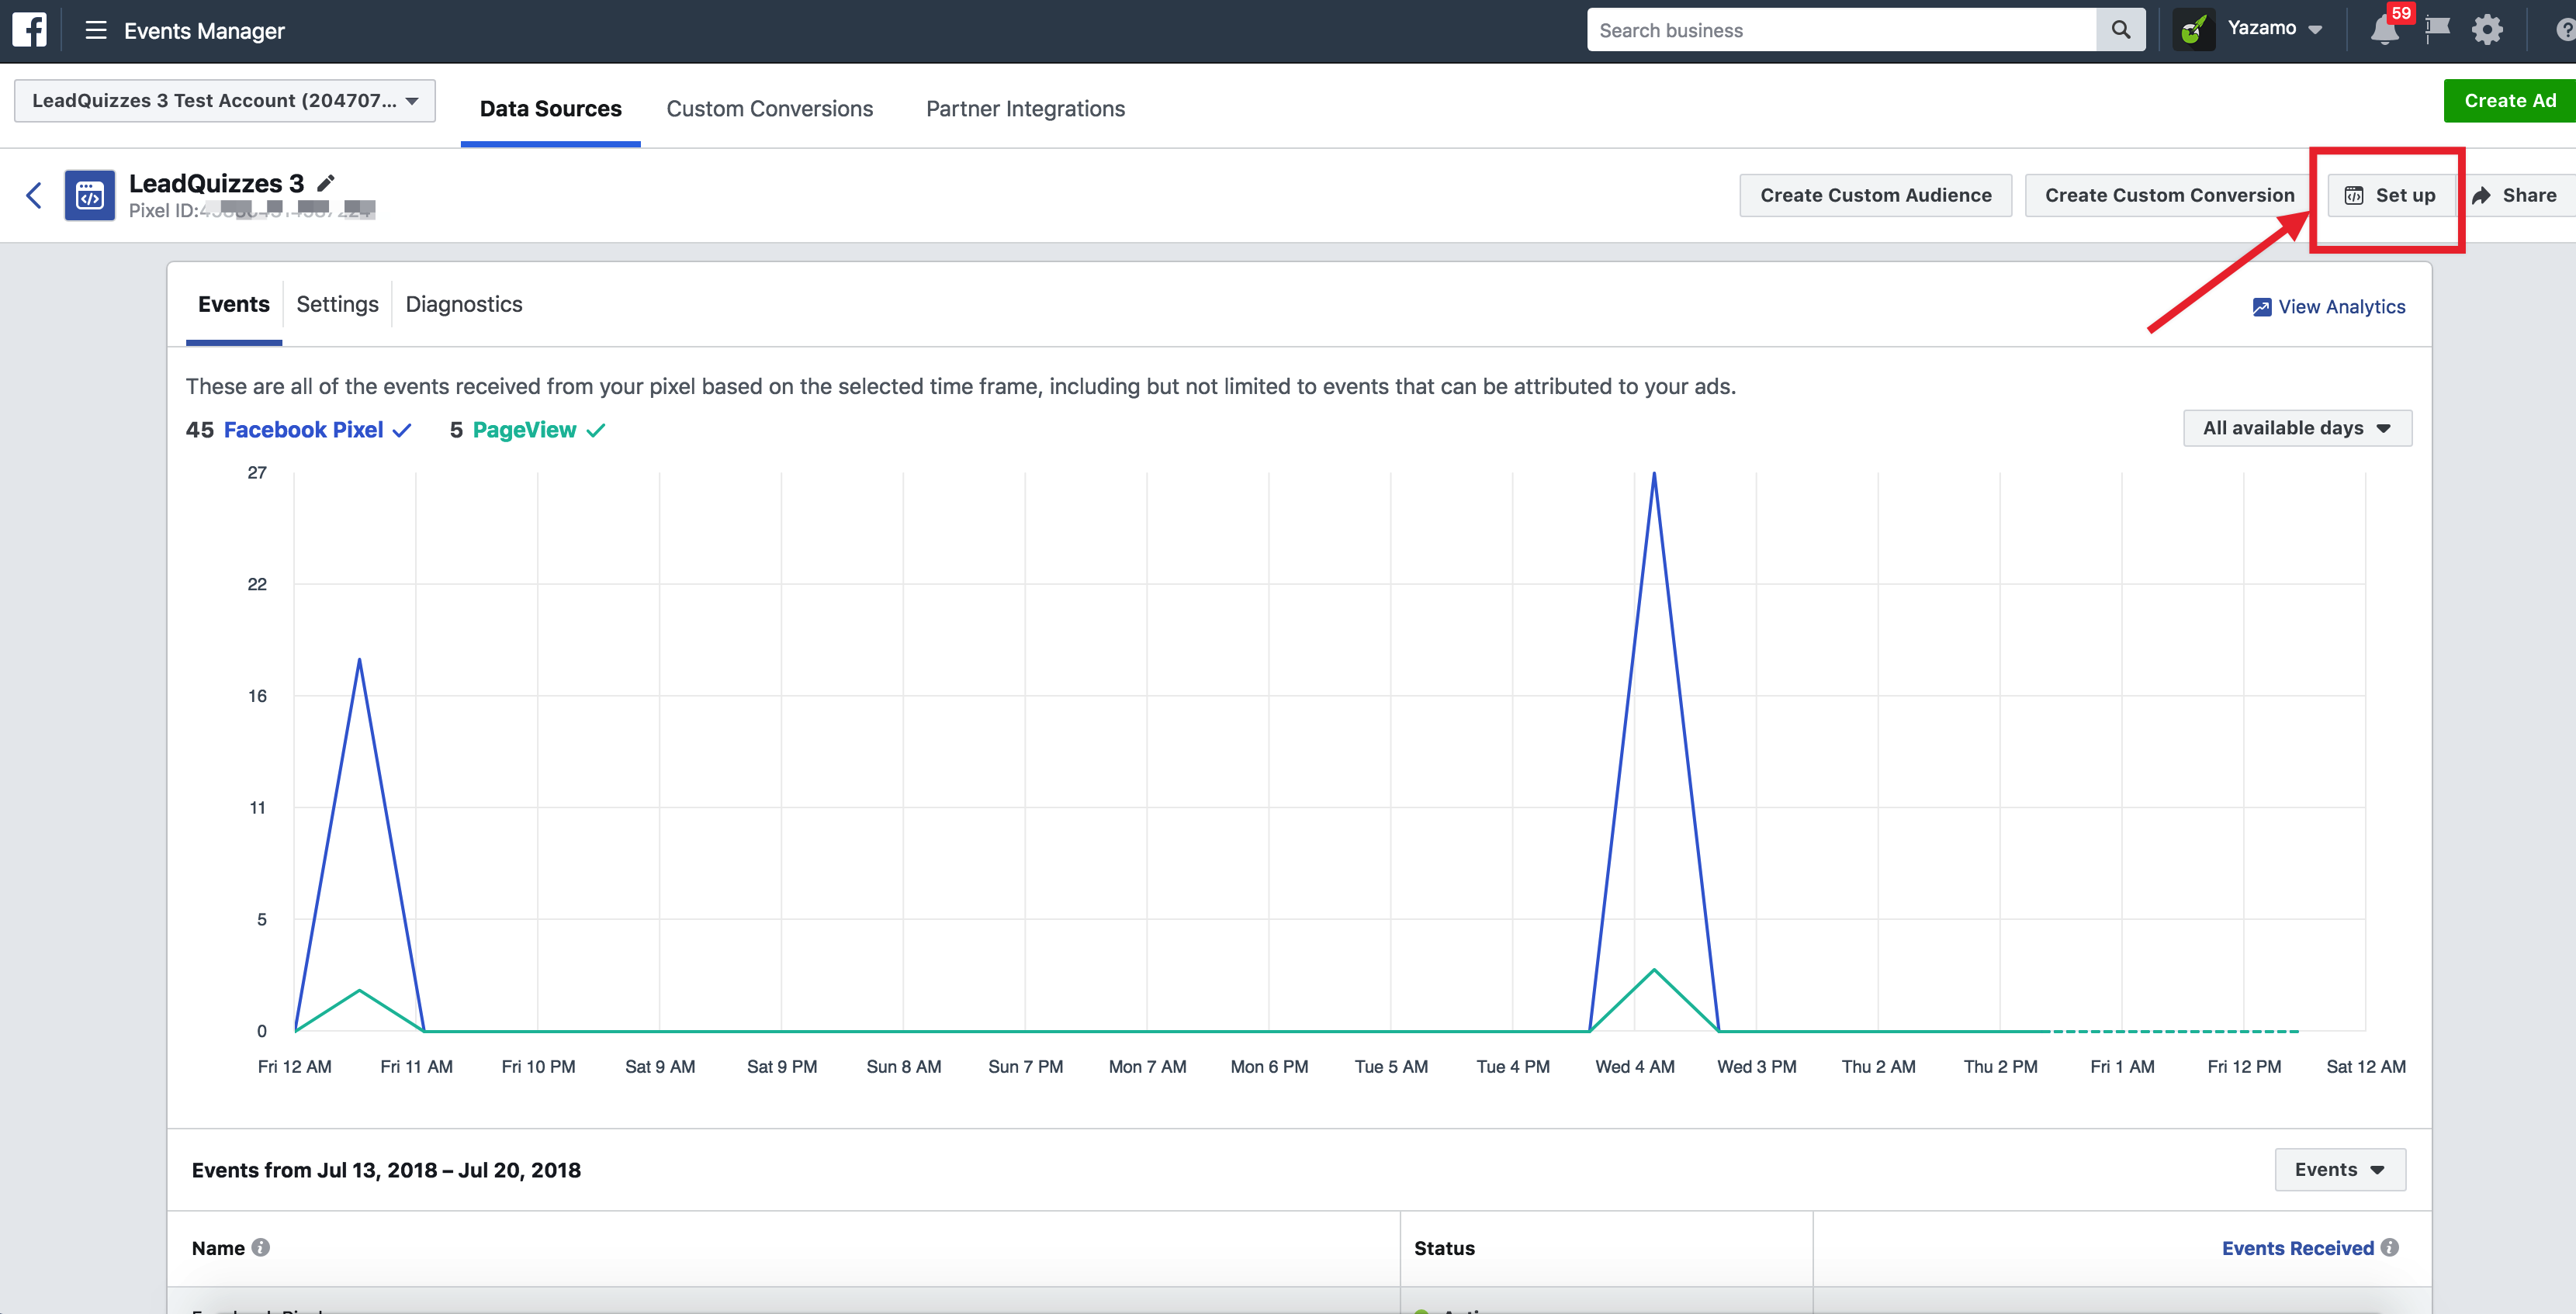
6. After you have clicked "Details" you will be redirected to your Facebook Pixel events dashboard. Next click "Set up" on the top right corner.
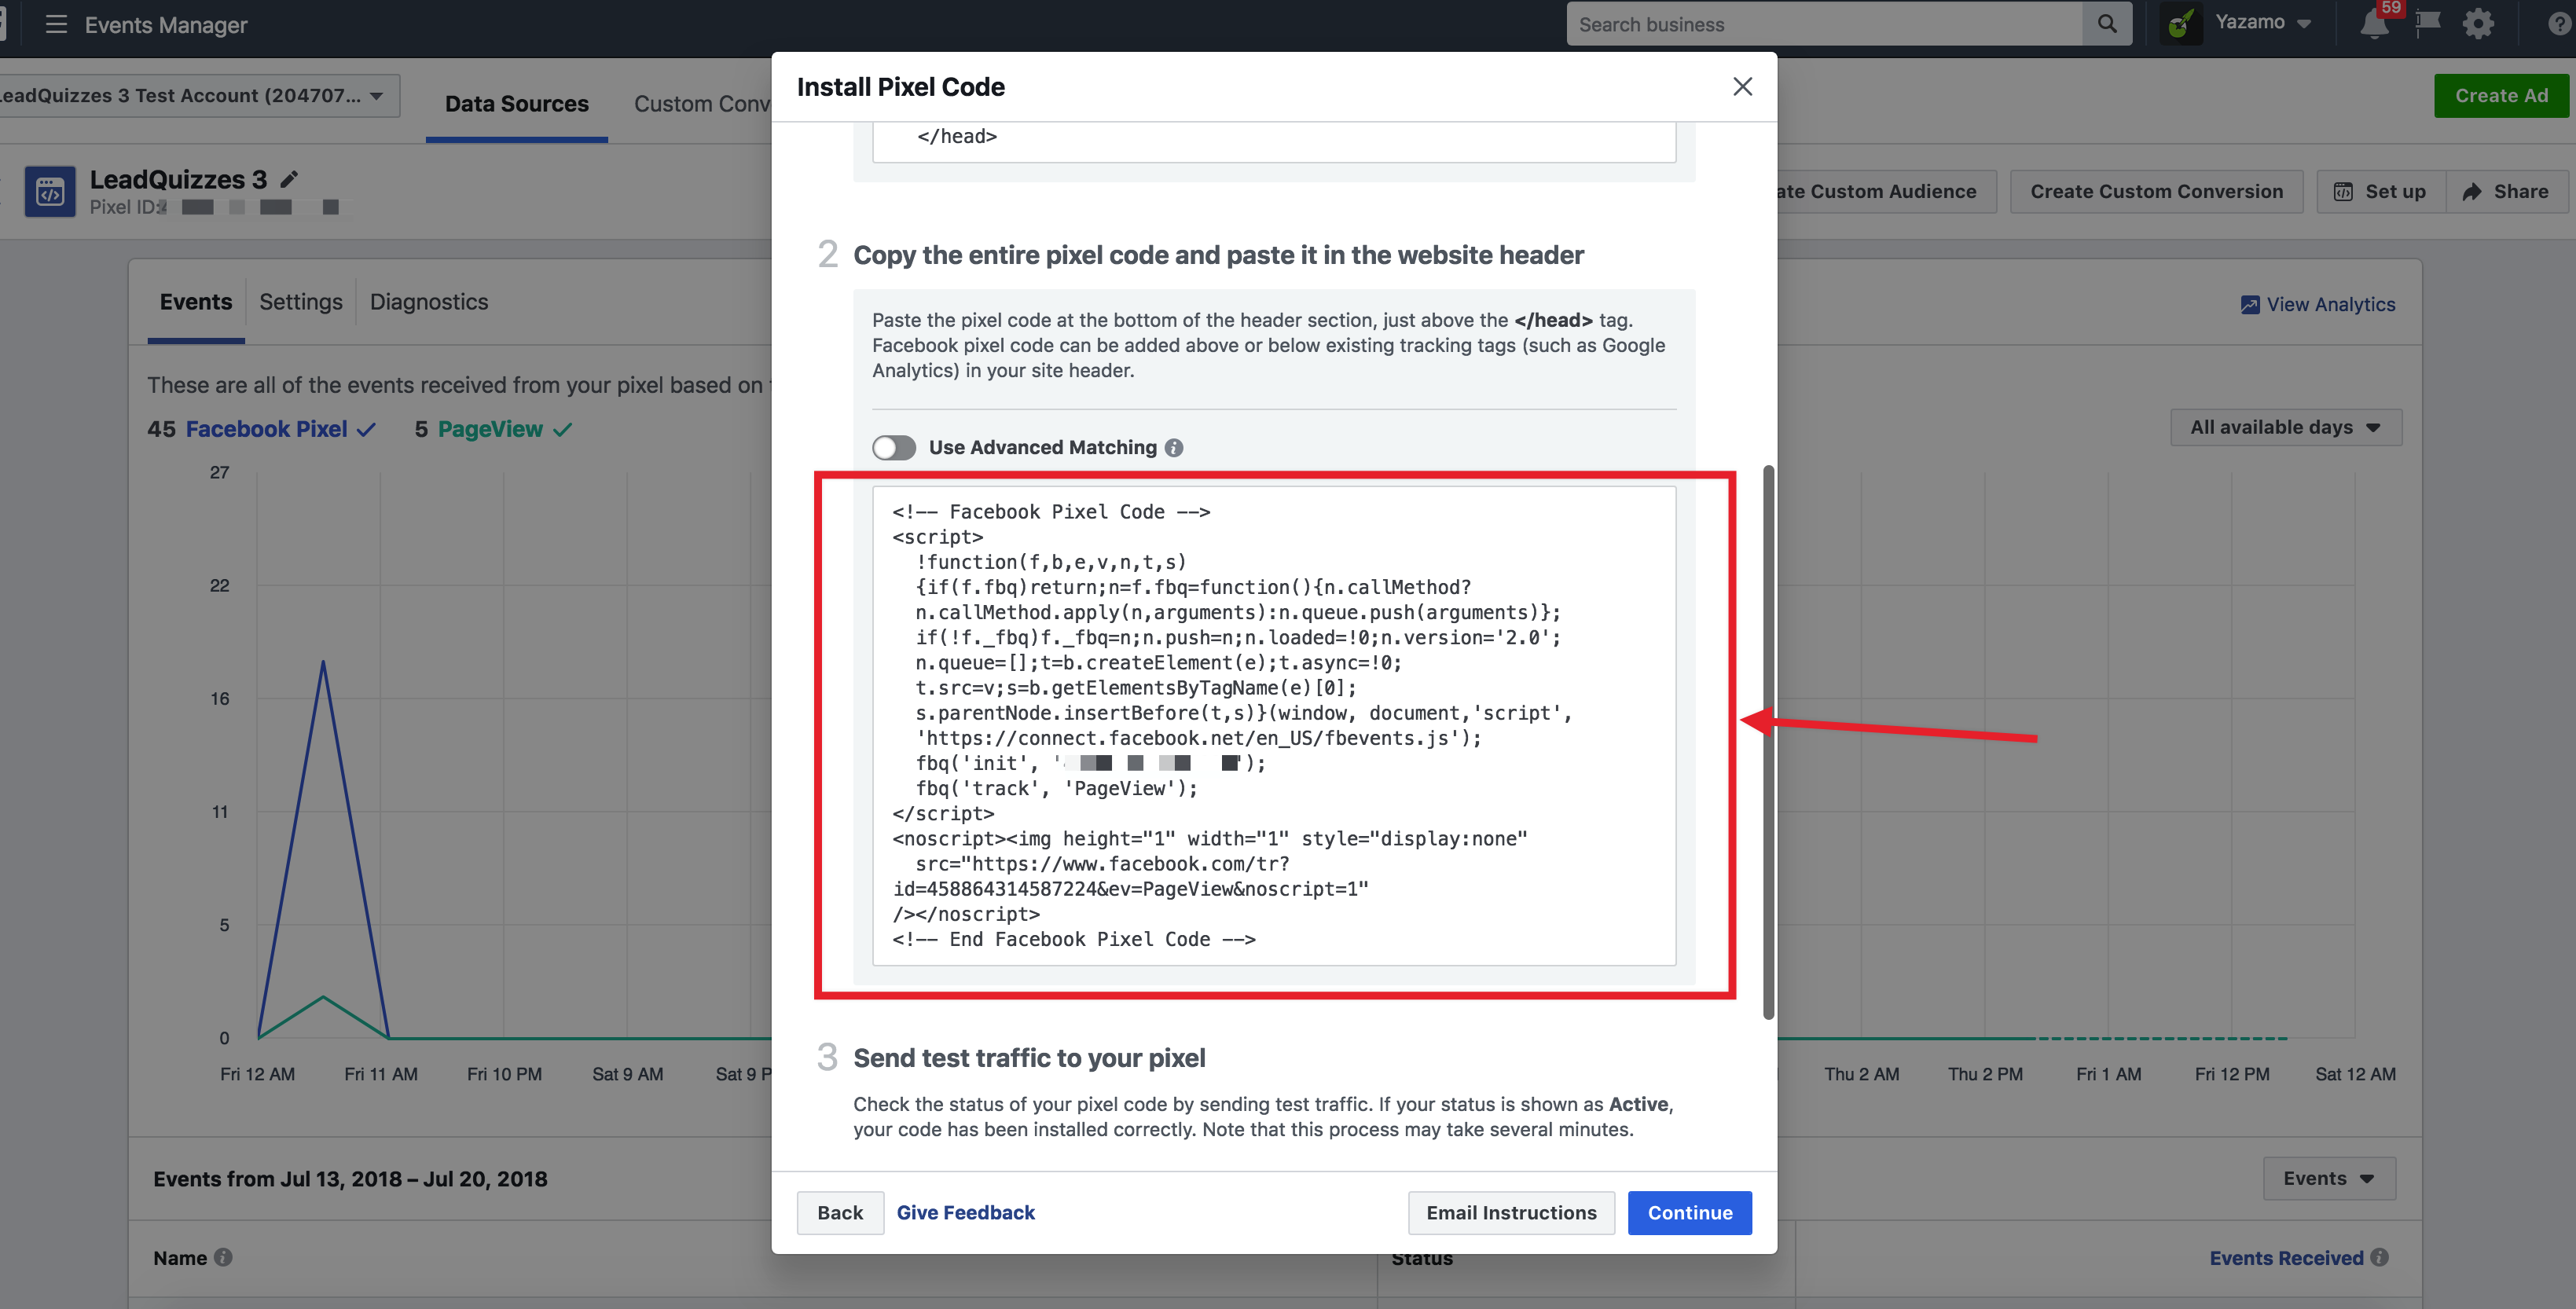
7. A popup will appear, click "Manually Install the Code Yourself" option from the popup screen.

8. Once you have clicked "Manually Install the Code Yourself" option from the popup screen. You will be shown your Facebook Pixel. Scroll down to selection titled "2. Copy the entire pixel code and paste it in the website header" and copy the code to your clipboard.
10. Now navigate to LeadQuizzes & click "Settings" in the top right-hand corner & select "Integrations" from the settings menu.

11. On the integrations page, find the Facebook Pixel integration & click "Setup", a popup will appear, copy & paste your Facebook Pixel code into the popup box. Click "Save" after pasting your Facebook Pixel code into the box.

Part 3: Configuring your Facebook Pixel Event & Parameter Values
Now that you have your Facebook Pixel Setup in LeadQuizzes. Let's move on to configuring your Facebook Pixel with LeadQuizzes content.
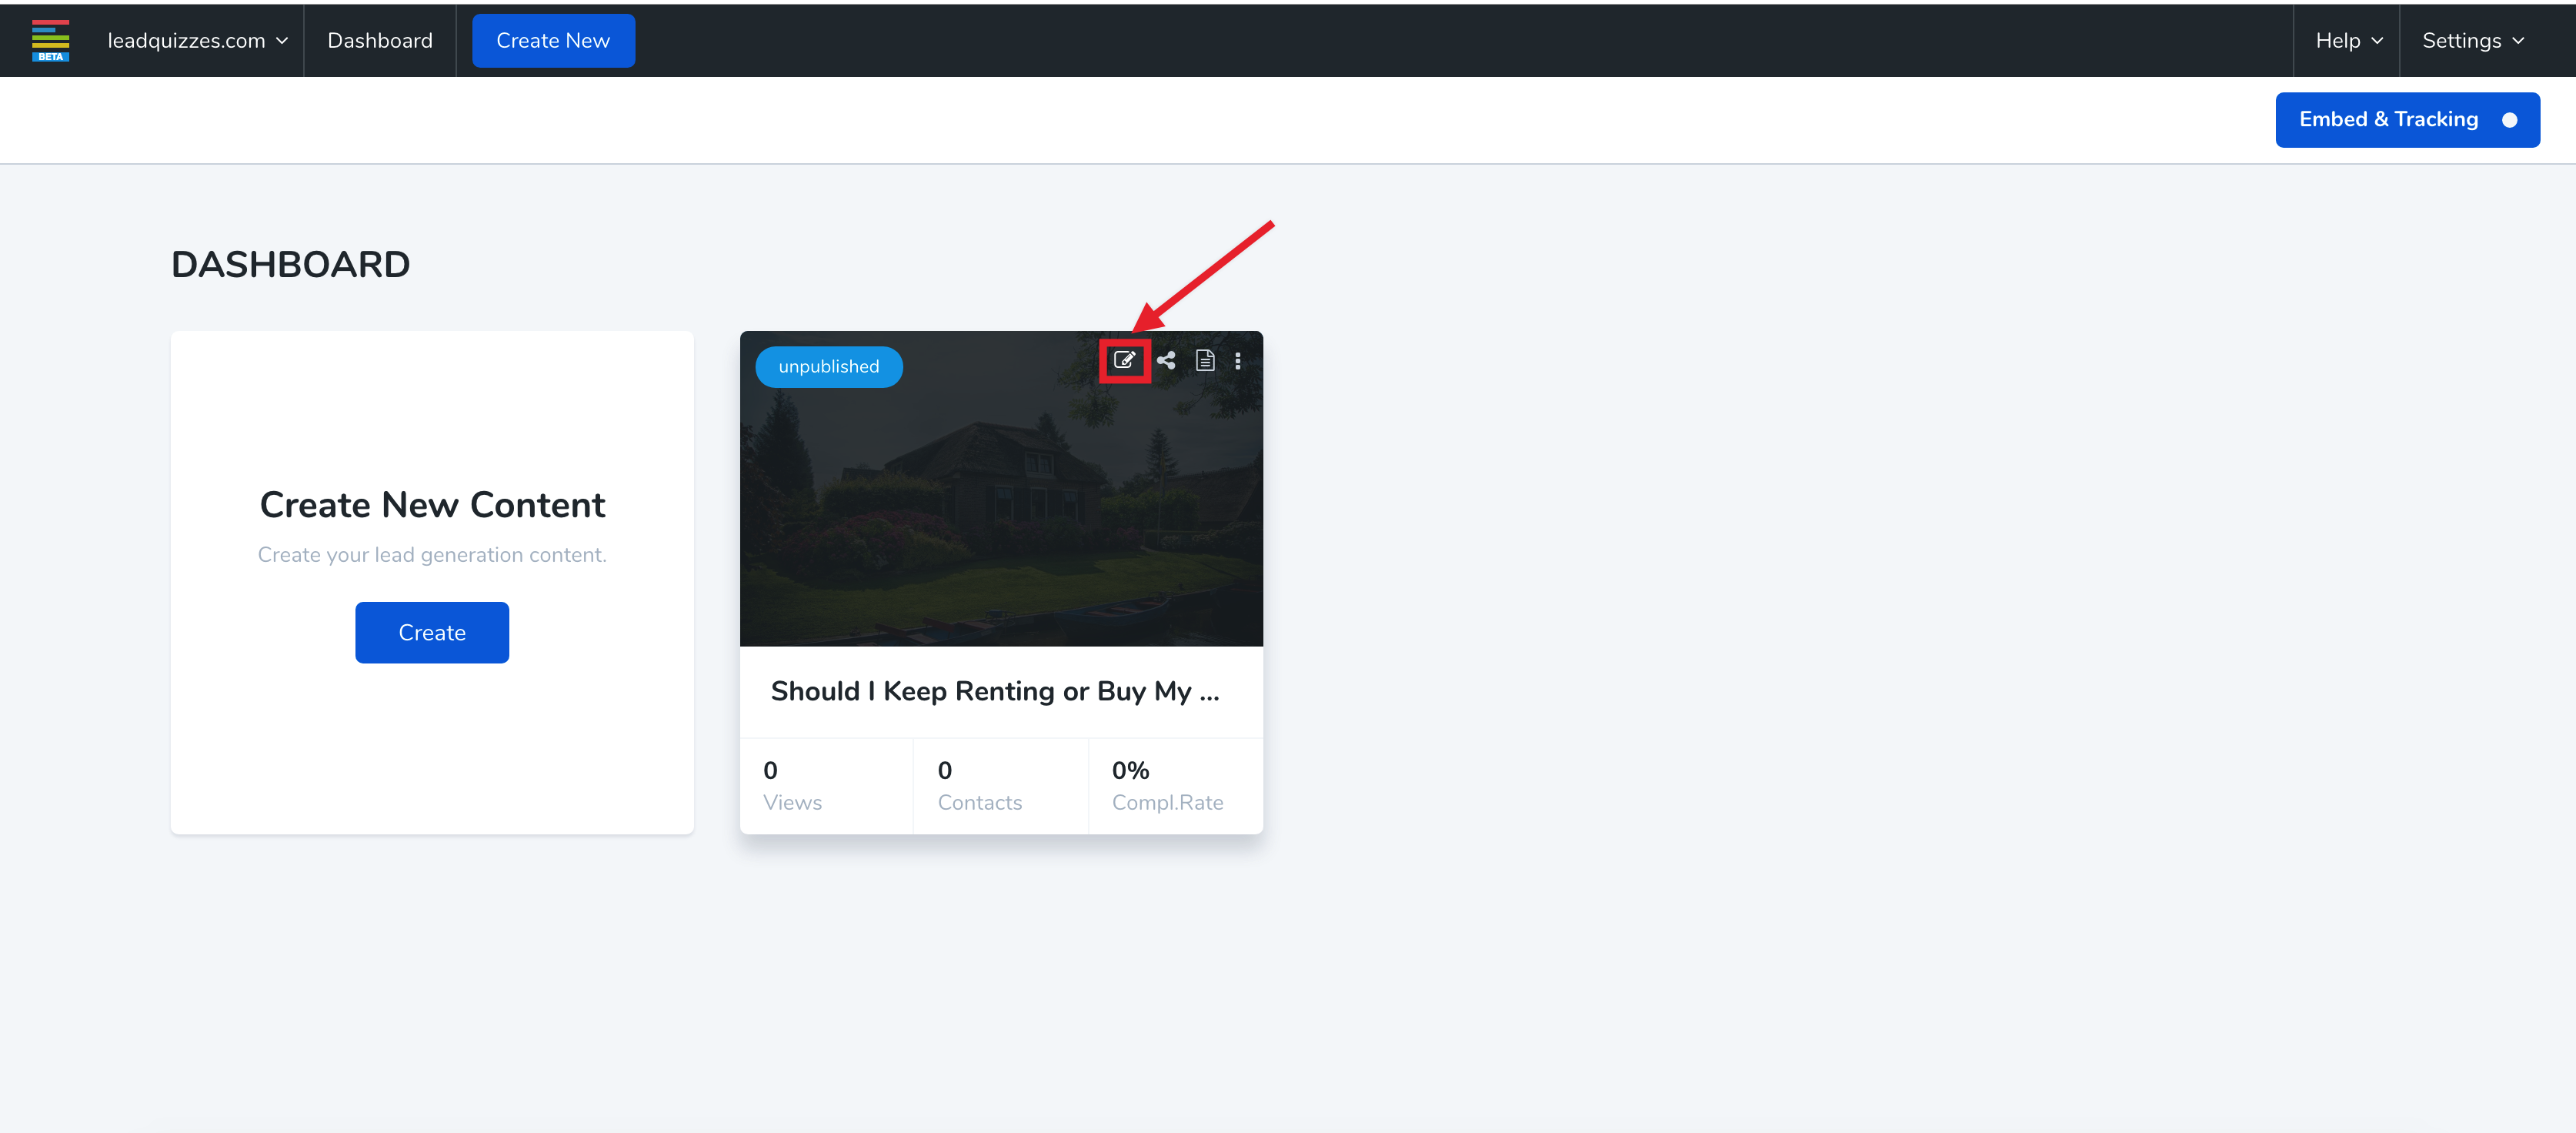
- To begin configuring your Facebook Pixel with your LeadQuizzes content. You will first have to select the content you would like to configure Facebook Pixel for & Click the "Edit" icon on it.
2. Once you are in the Content Builder, click "Configure" on the top menu.

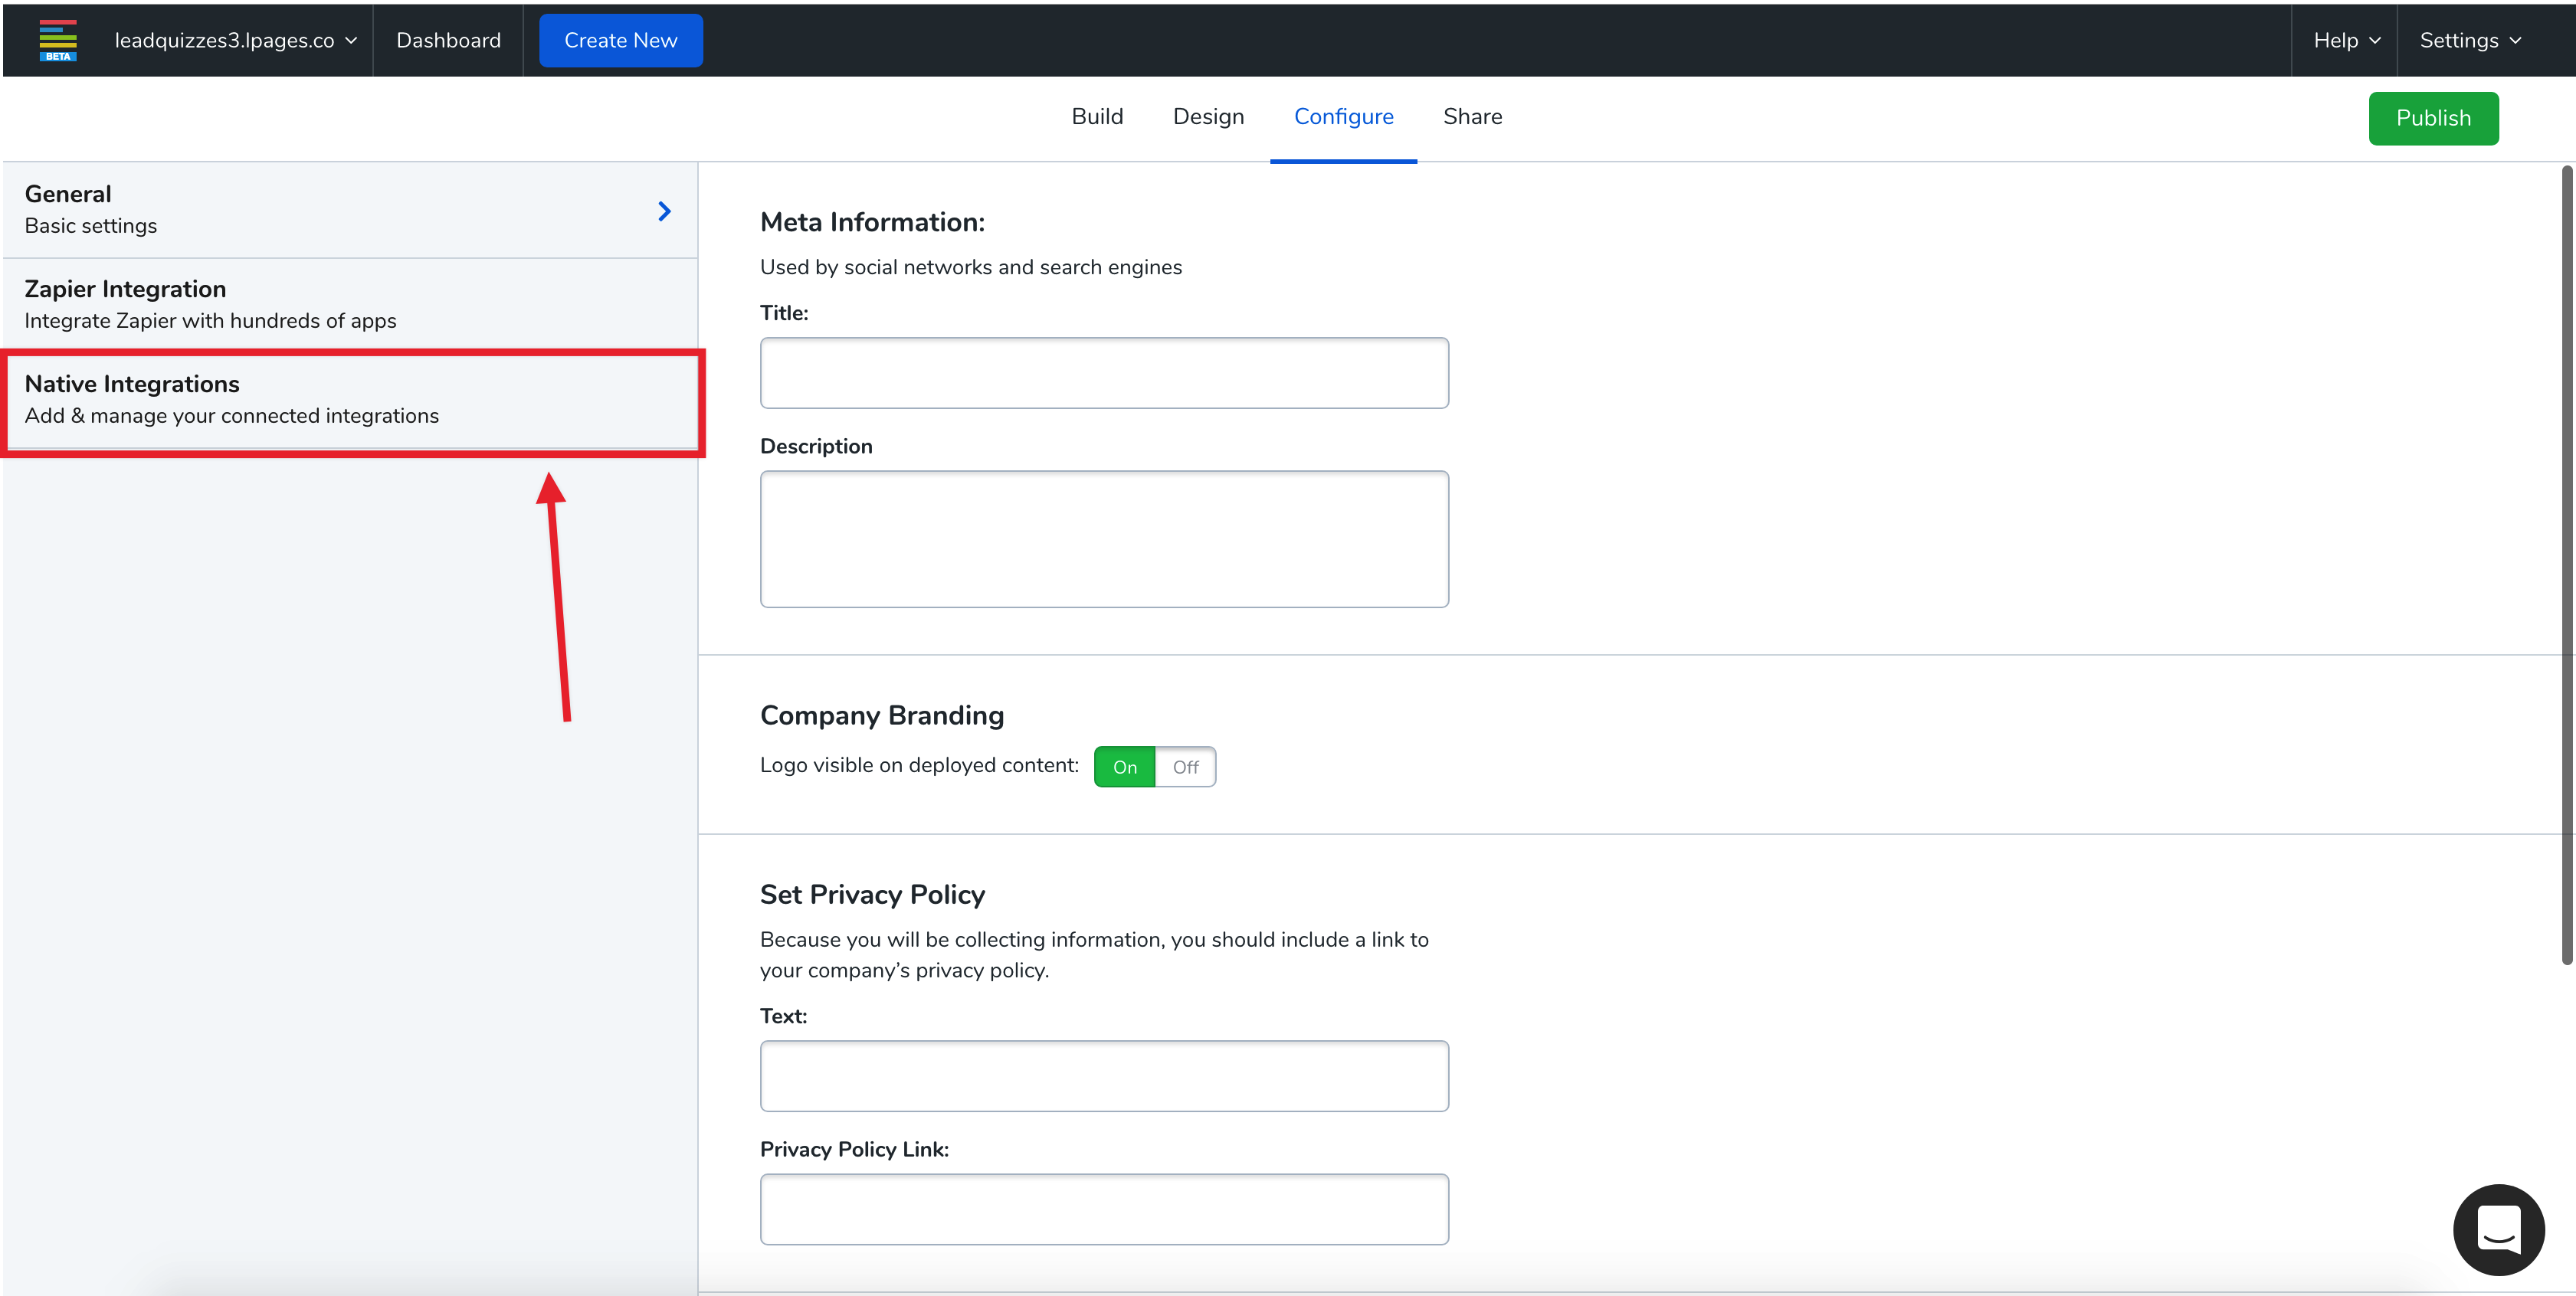
3. On the configure page click "Native Integrations" on the left side.
4. Click "Add Integrations" button on the native Integrations Page.
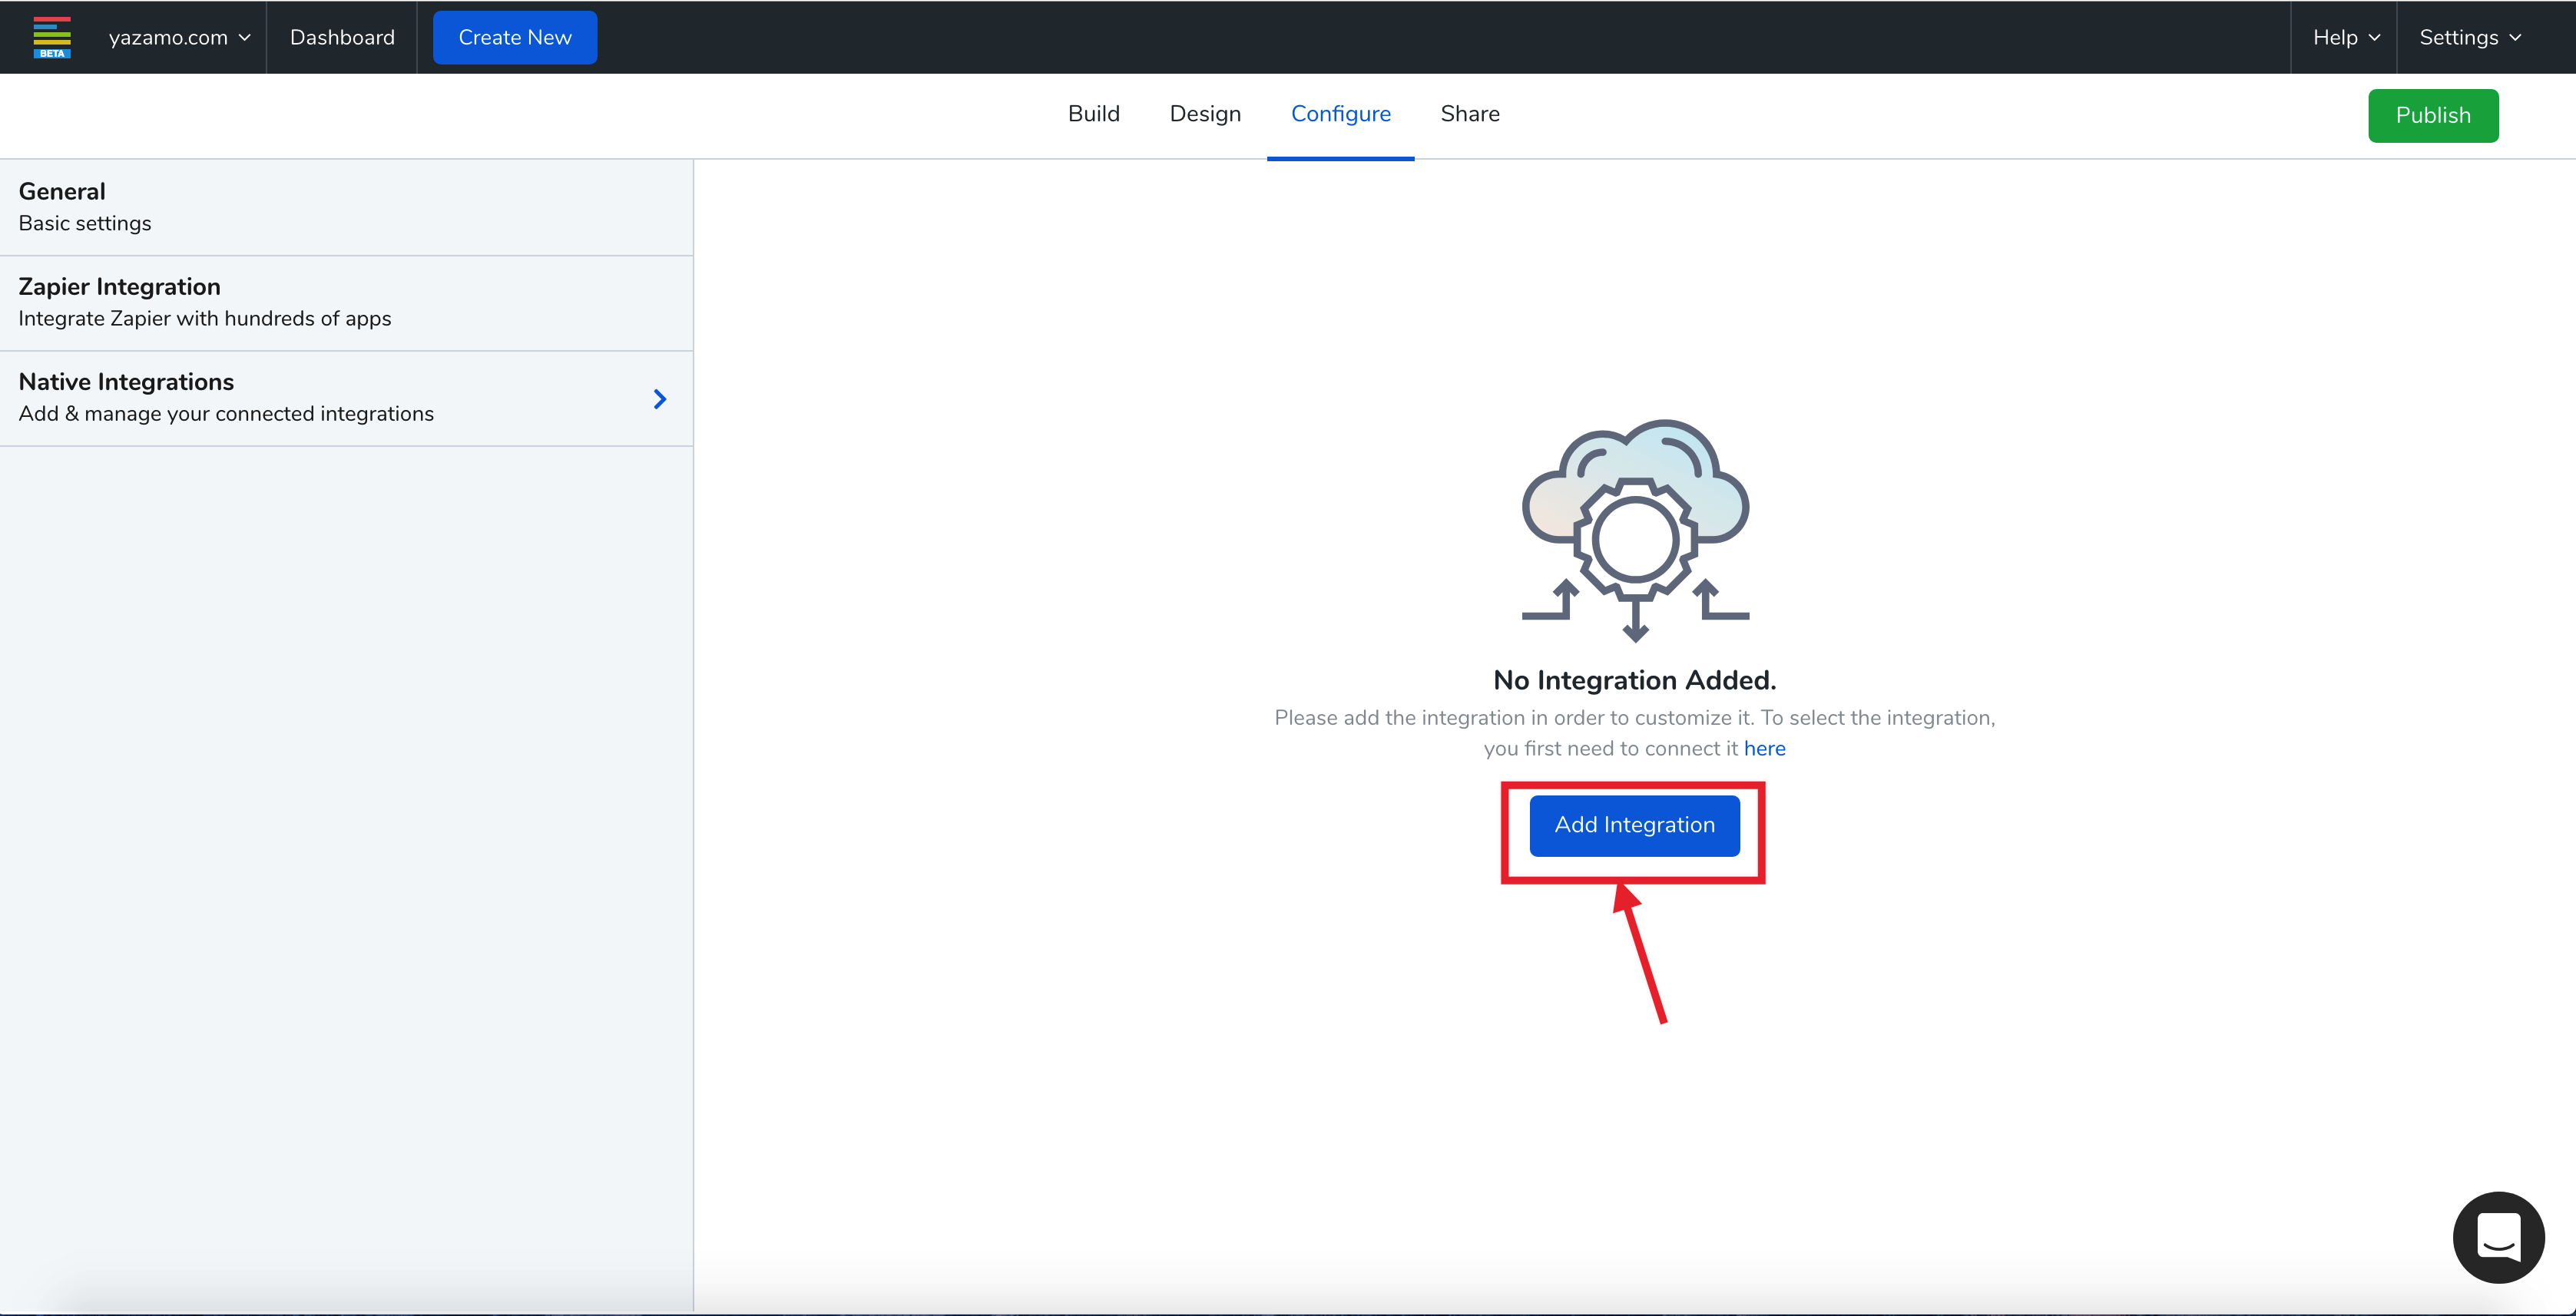
Note: All integrations configured for your particular LeadQuizzes content will appear under the native integrations page.
5. On the add integrations popup, select "Facebook Pixel" from the drop-down menu. Only integrations setup on the Integrations page in your website property will appear on the drop-down menu.

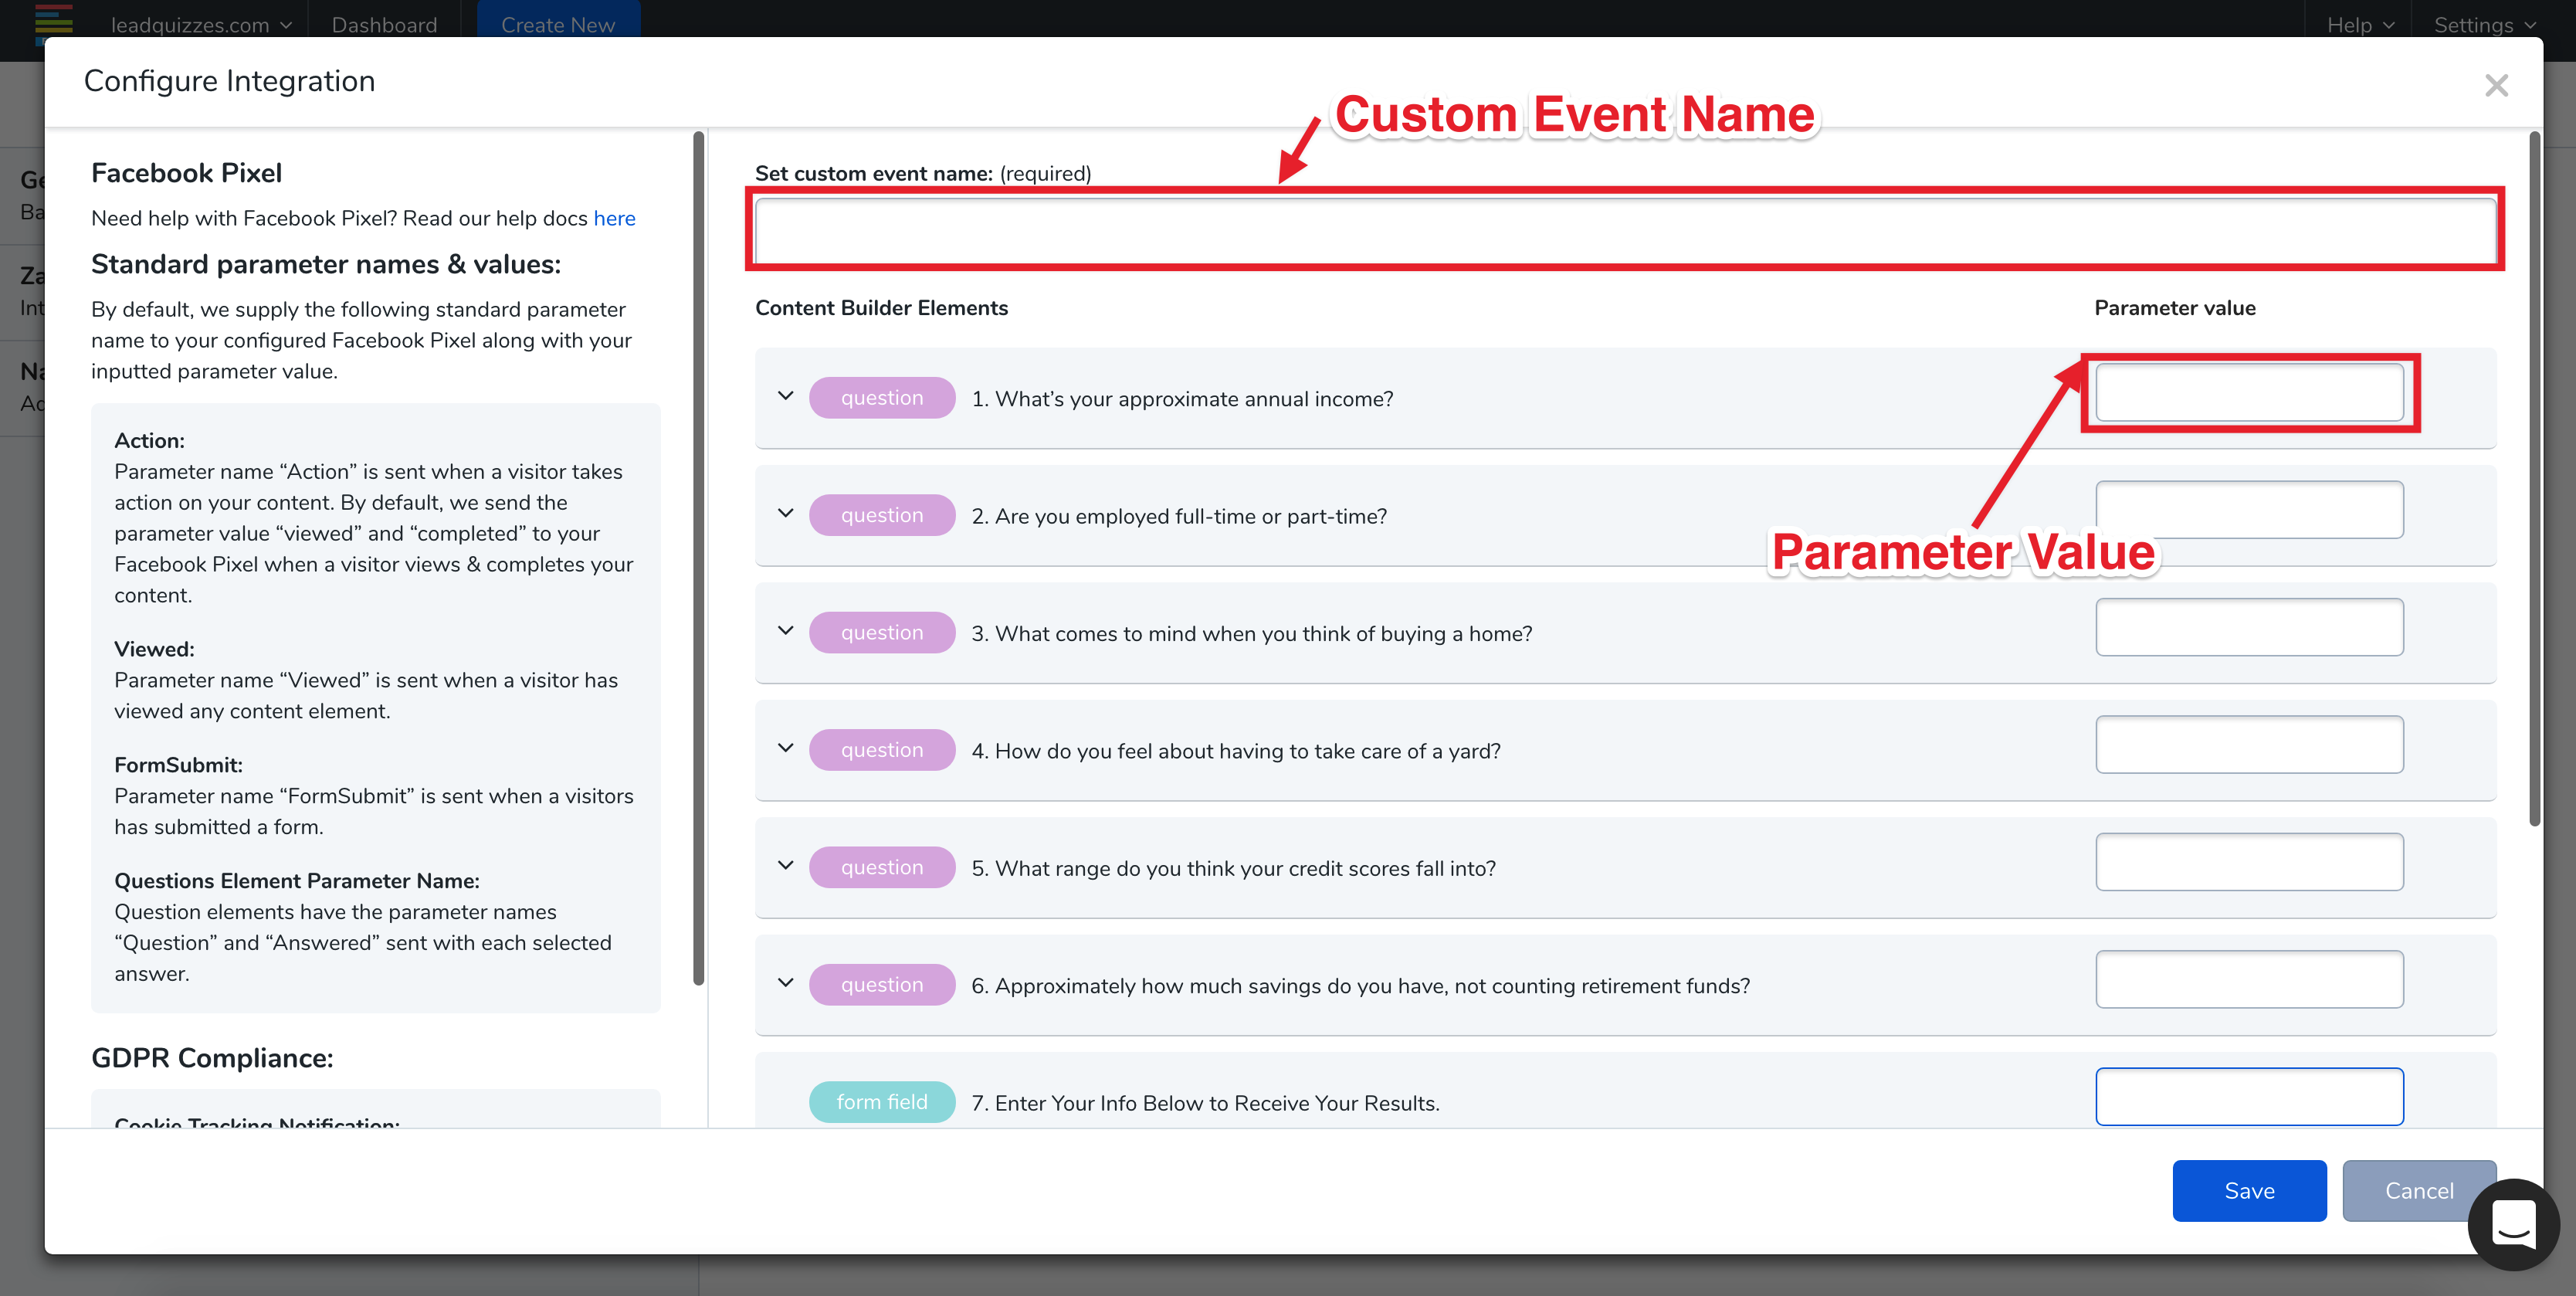
6. Once "Facebook Pixel" has been selected from the drop-down menu, all your content elements will appear allowing you to create Facebook Pixel custom event name & enter a parameter value for each element in your content.
What are facebook pixel events?
- Events are actions that happen on your website. (like when someone takes complete your quiz)
What are Facebook event parameter?
- Parameters are categories or additional information about your Facebook pixel event (like a quiz taker's specific result, answer selected, lead capture form submission)


Standard parameter names & values
By default, we supply the following standard parameter names to your configured Facebook Pixel along with your inputted parameter value.
- Action: Parameter name “Action” is sent when a visitor takes action on your content. By default, we send the parameter value “viewed” and “completed” to your Facebook Pixel when a visitor views & completes your content.
- Viewed: Parameter name “Viewed” is sent when a visitor has viewed any content element.
- FormSubmitted: Parameter name “FormSubmitted” is sent when a visitors has submitted a form.
- Questions Element Parameter Name: Question elements have the parameter names “Question” and “Answered” sent with each selected answer.
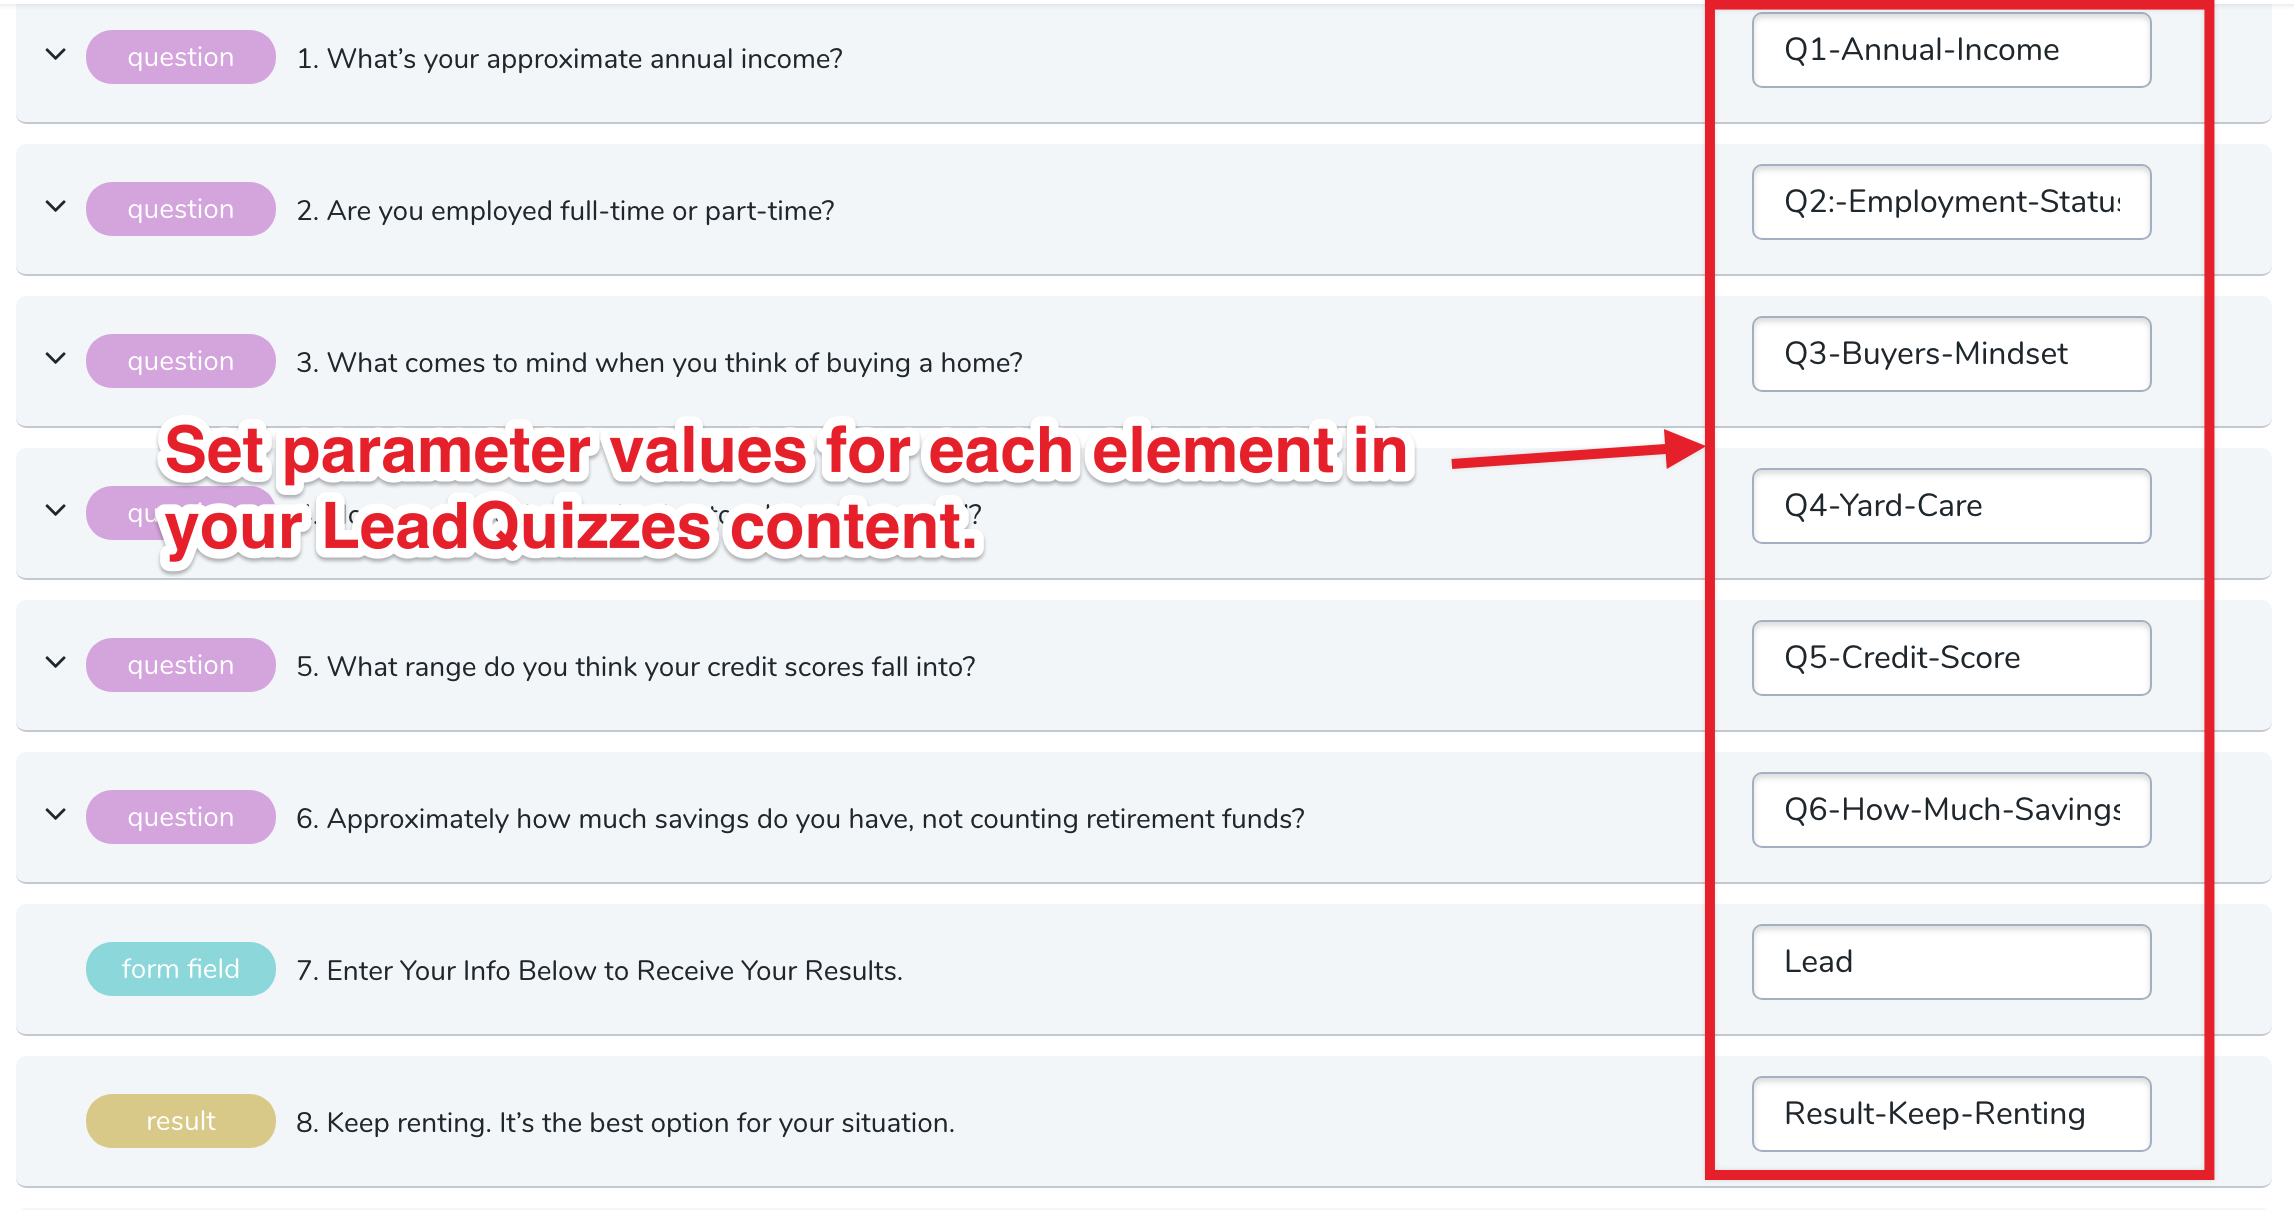
Q: What parameter values should I give if I don’t know much about this? Do I need to add this for everything or can I skip it if I’m new and want to track conversions on leads?
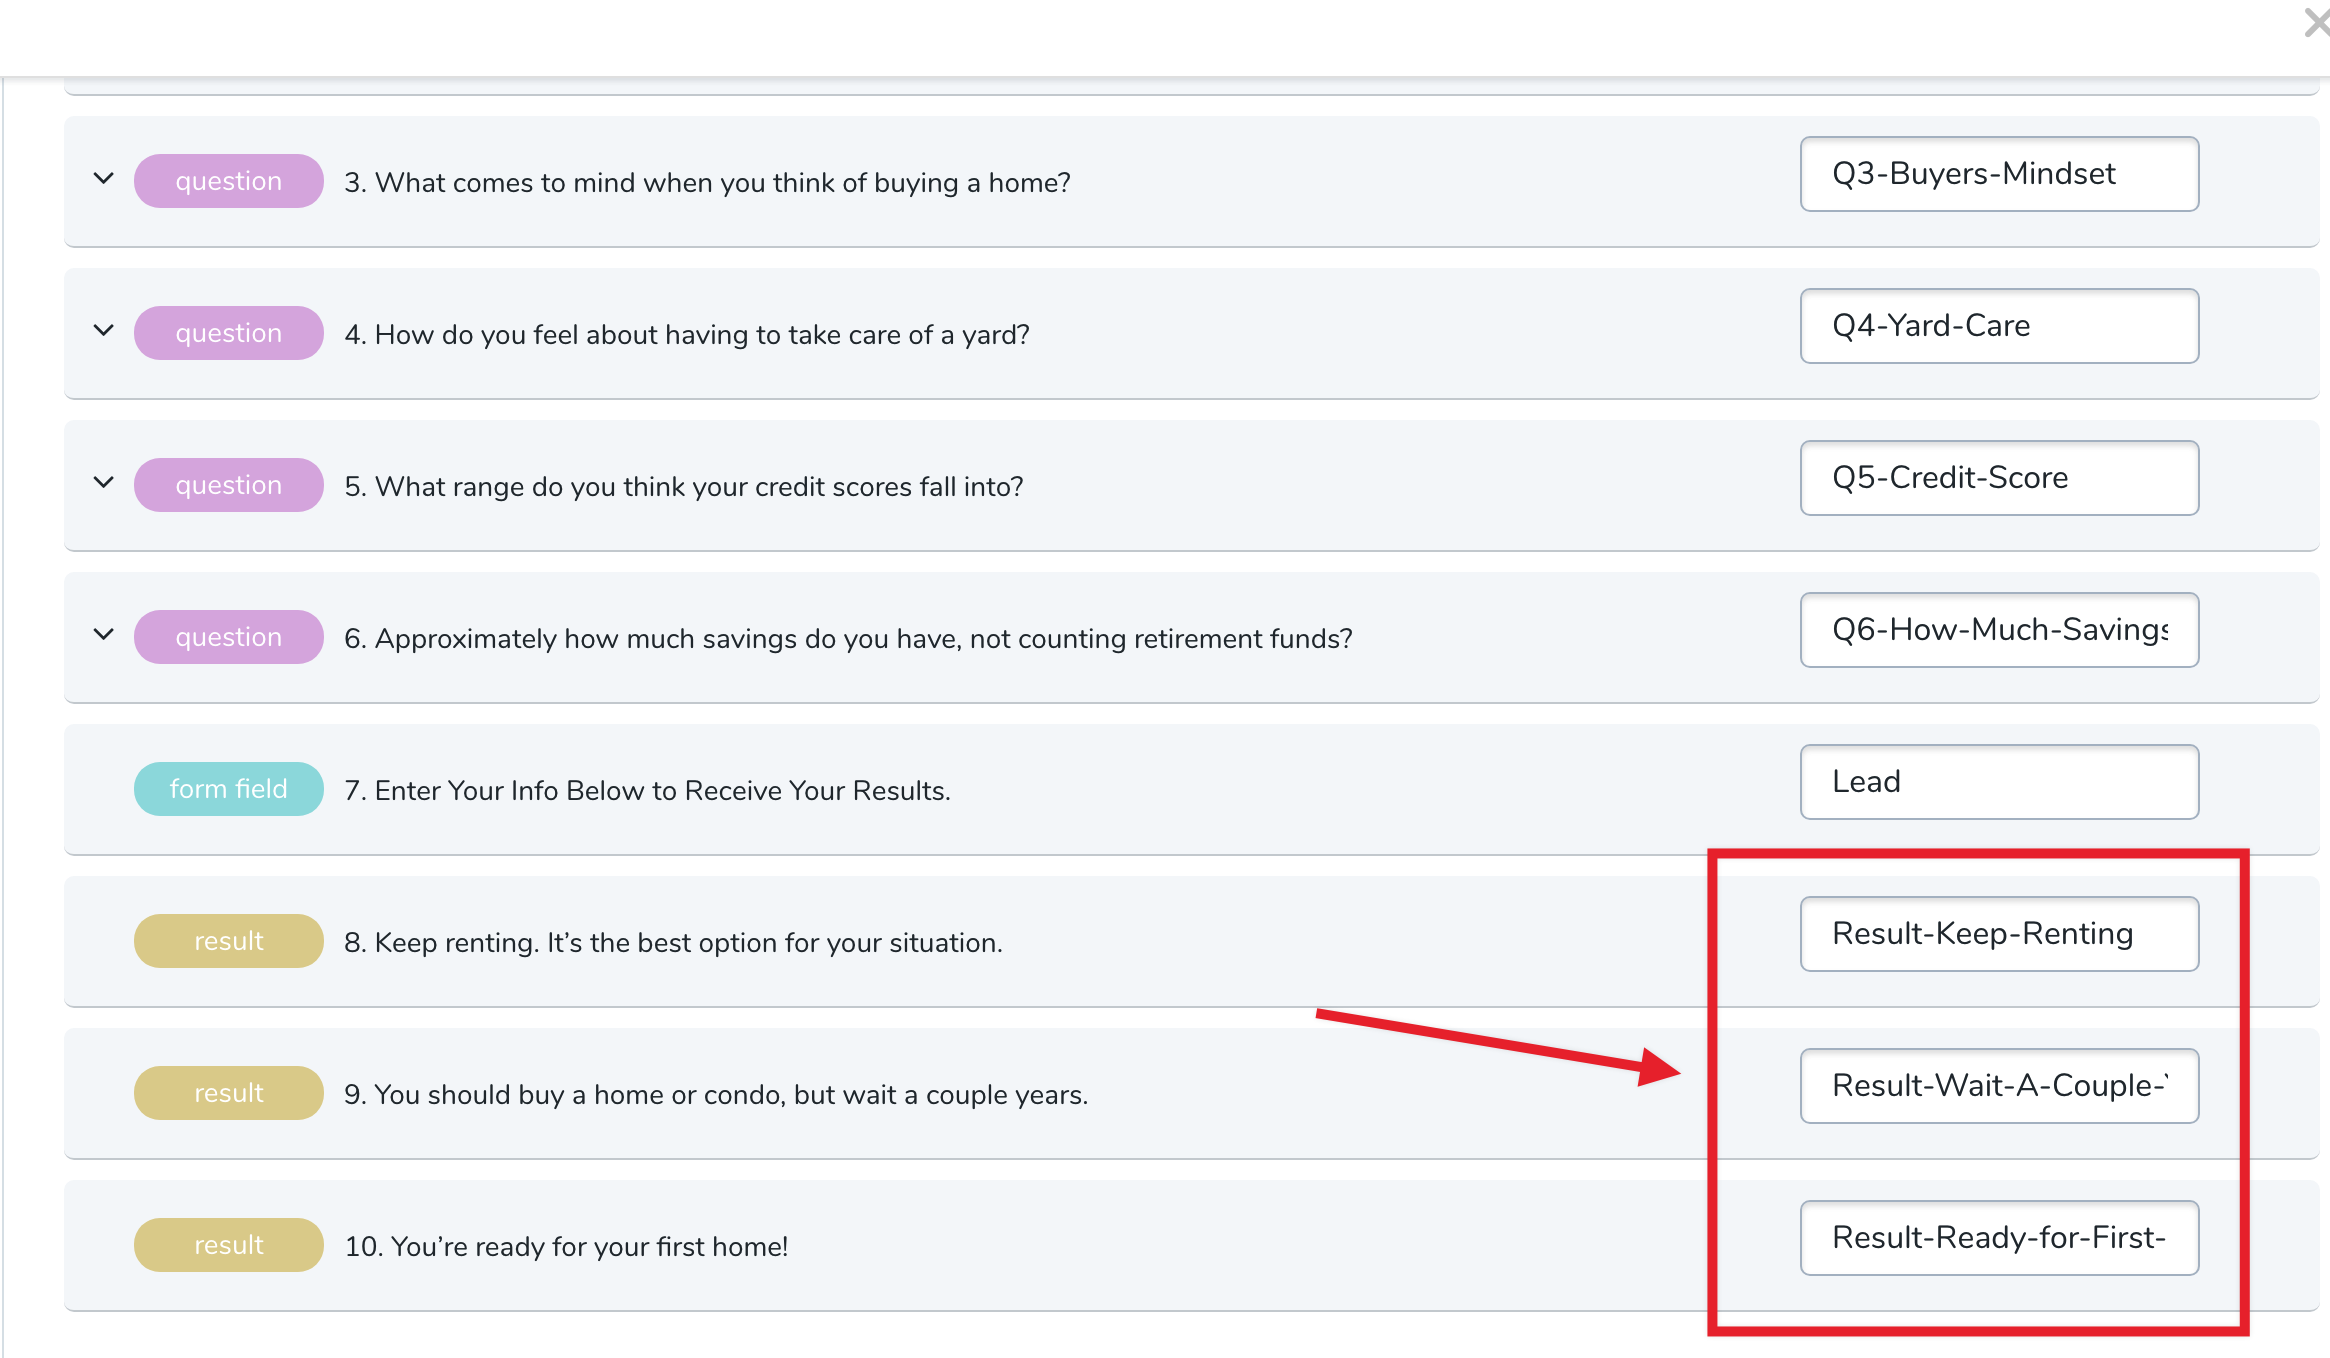
A: Parameter values allow you to reference different content elements in your Facebook Events Manager when building custom conversions or custom audiences. We recommend parameter values names that you can easily remember & reference. For example, if Question 1 in your content is "What’s your approximate annual income?" I would give it the parameter value "Q1-Annual-Income". You do not need to create a parameter value for each content, but we strongly recommend it. You can always use the parameter values at a future date.

Part 4: Verifying Facebook Pixel Events using Pixel Helper
To verify your Facebook Pixel is working correctly follow the steps below.
1. Make sure that you have added & configured the Facebook Pixel to your LeadQuizzes content. If not, read part 1-3 in this document.

2. Once this is verified and your content is published verify that you have the Facebook Pixel Helper added to a Google Chrome Browser from this link: https://chrome.google.com/webstore/detail/facebook-pixel-helper/fdgfkebogiimcoedlicjlajpkdmockpc?hl=en

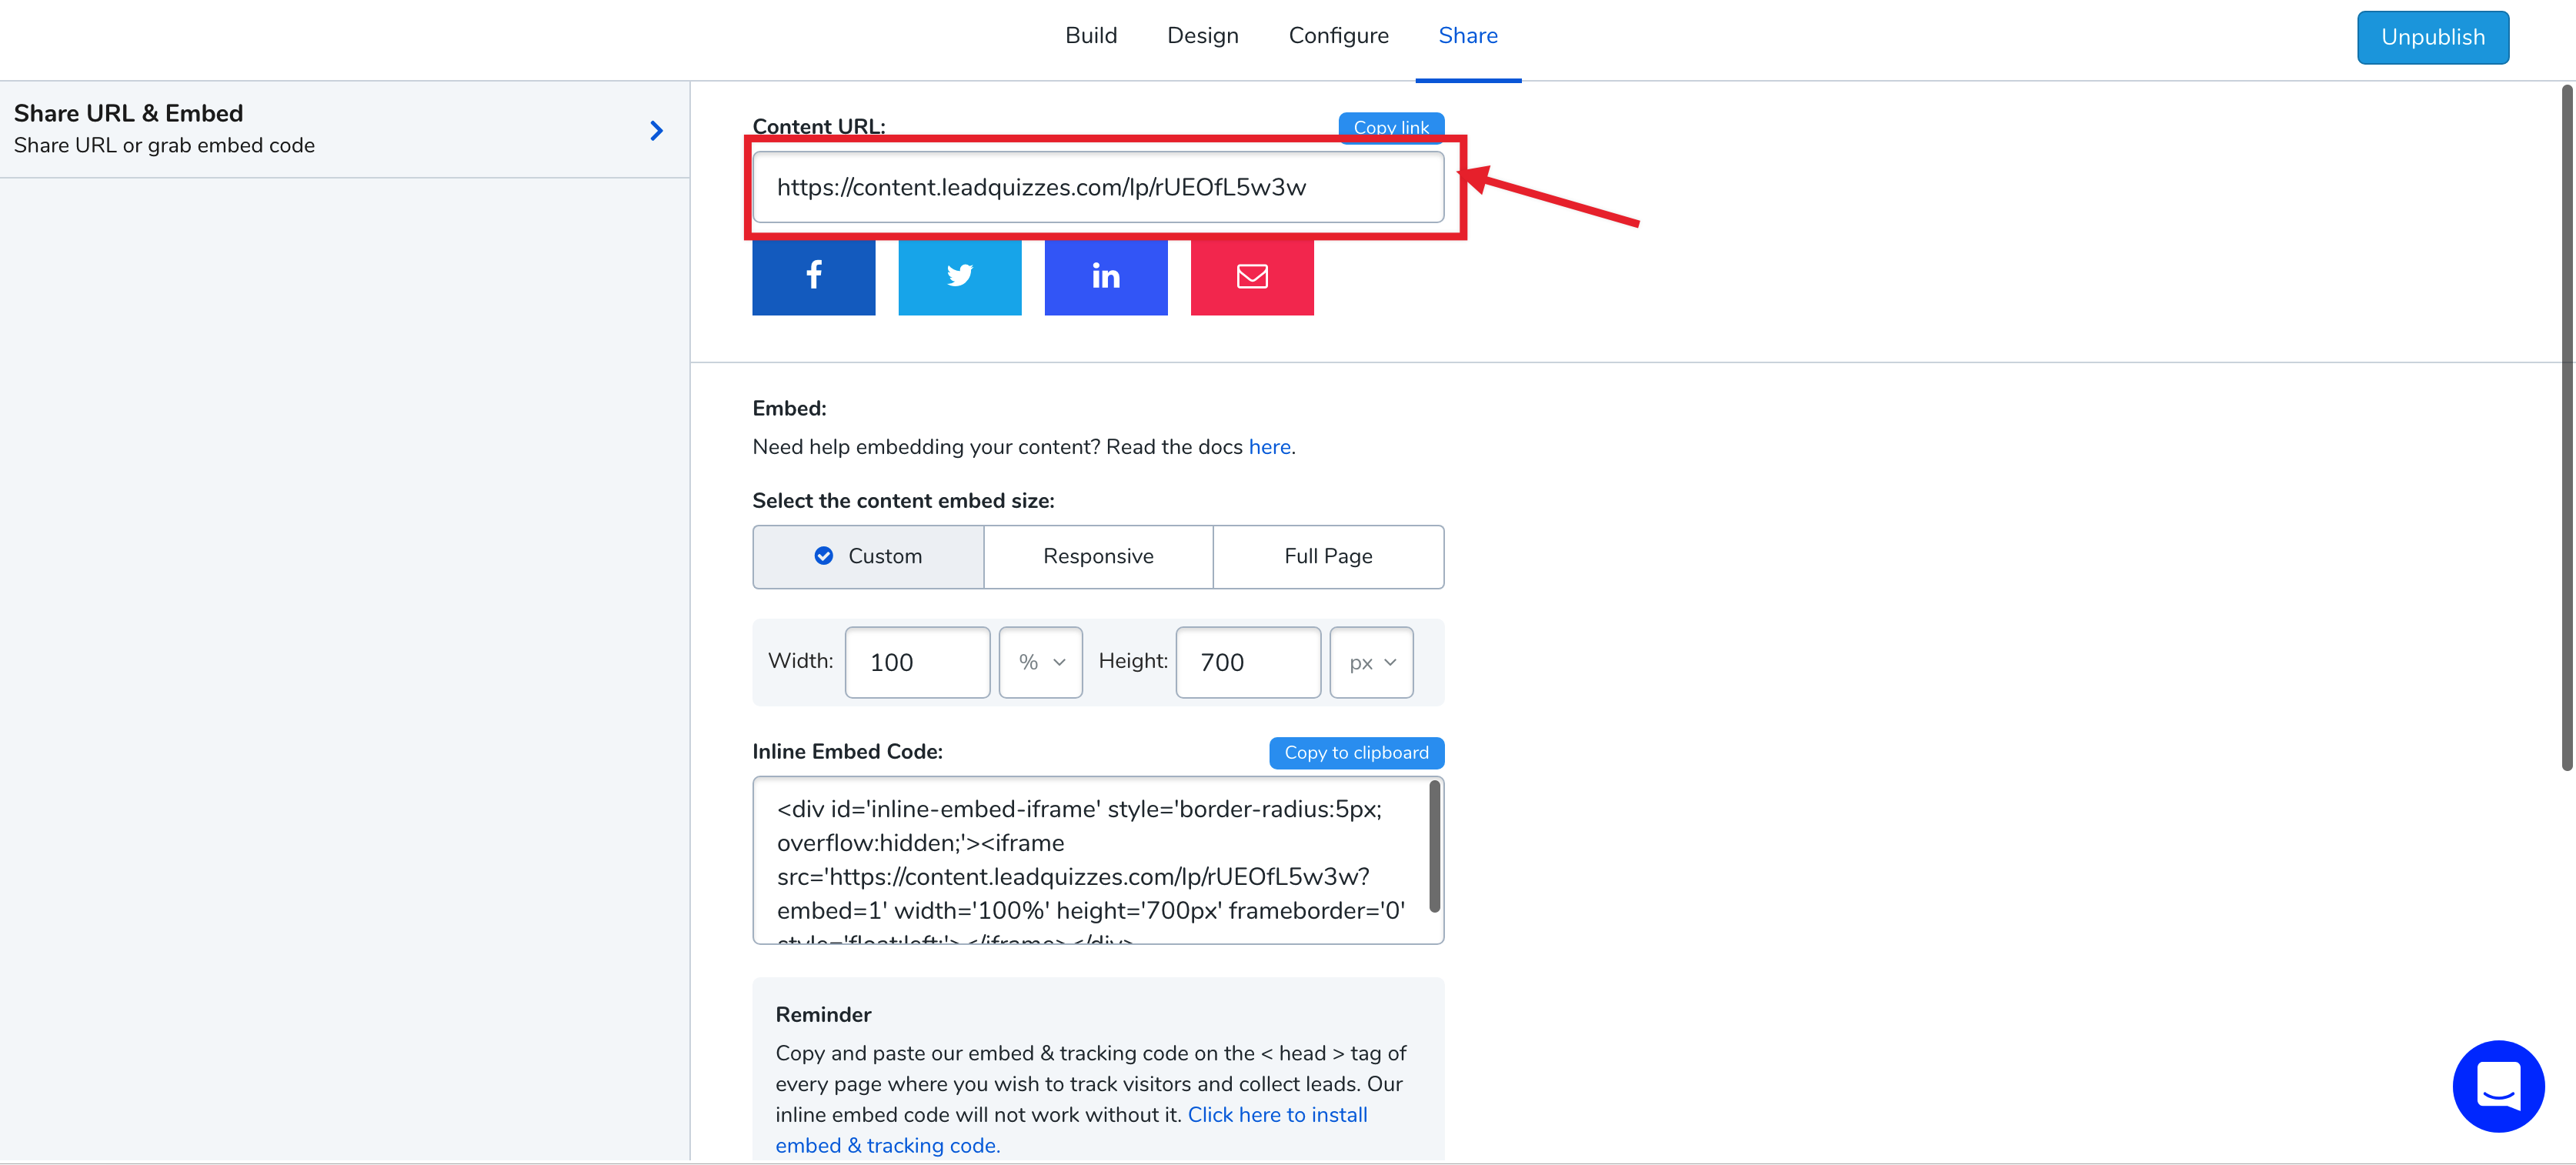
3. Open your LeadQuizzes content with the content.leadquizzes.com/lp/ URL in a Google Chrome browser where the Facebook Pixel Helper extension is added.
4. Take your LeadQuizzes content from start to finish.

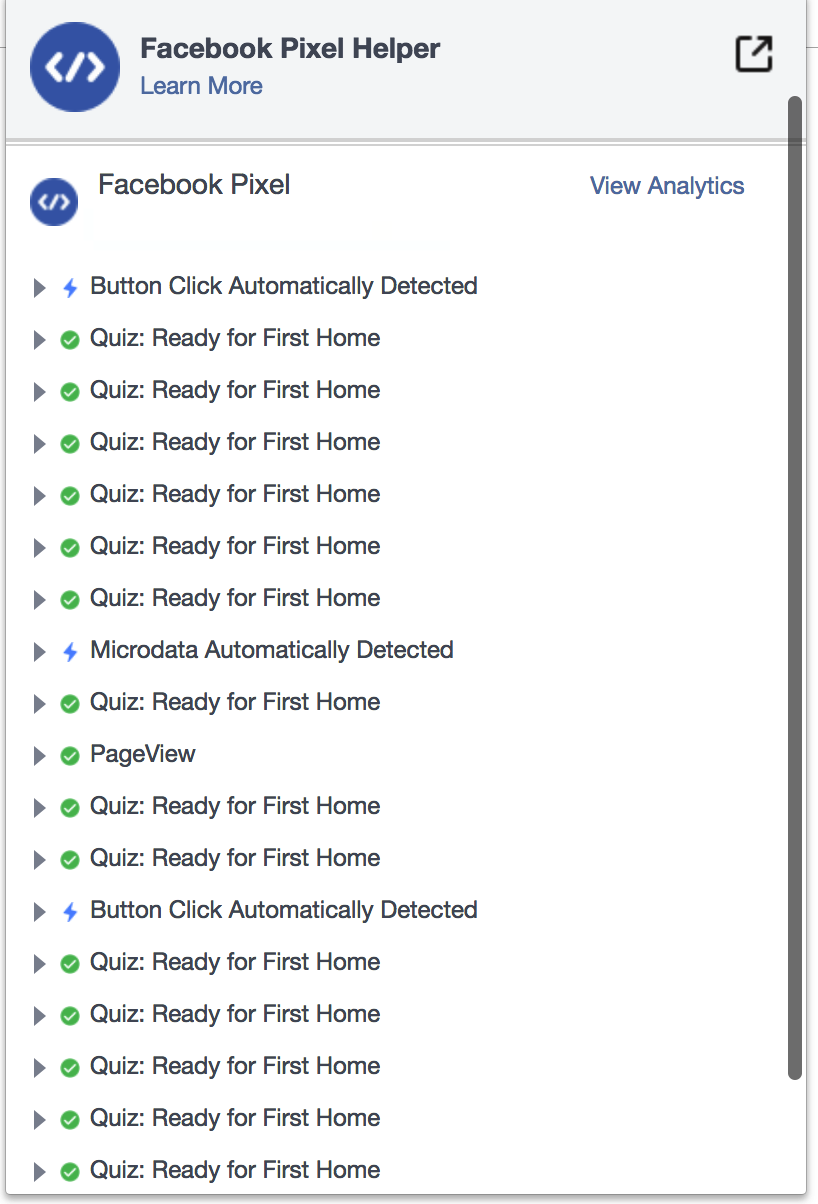
5. After taking your LeadQuizzes content from start to finish. Open up Facebook Pixel Helper extension. You should see your event name for your content & parameter values inputted in part 1-3. Make sure you do not have a popup blocker/privacy extension installed on your browser. This can prevent the Facebook Pixel from firing correctly.
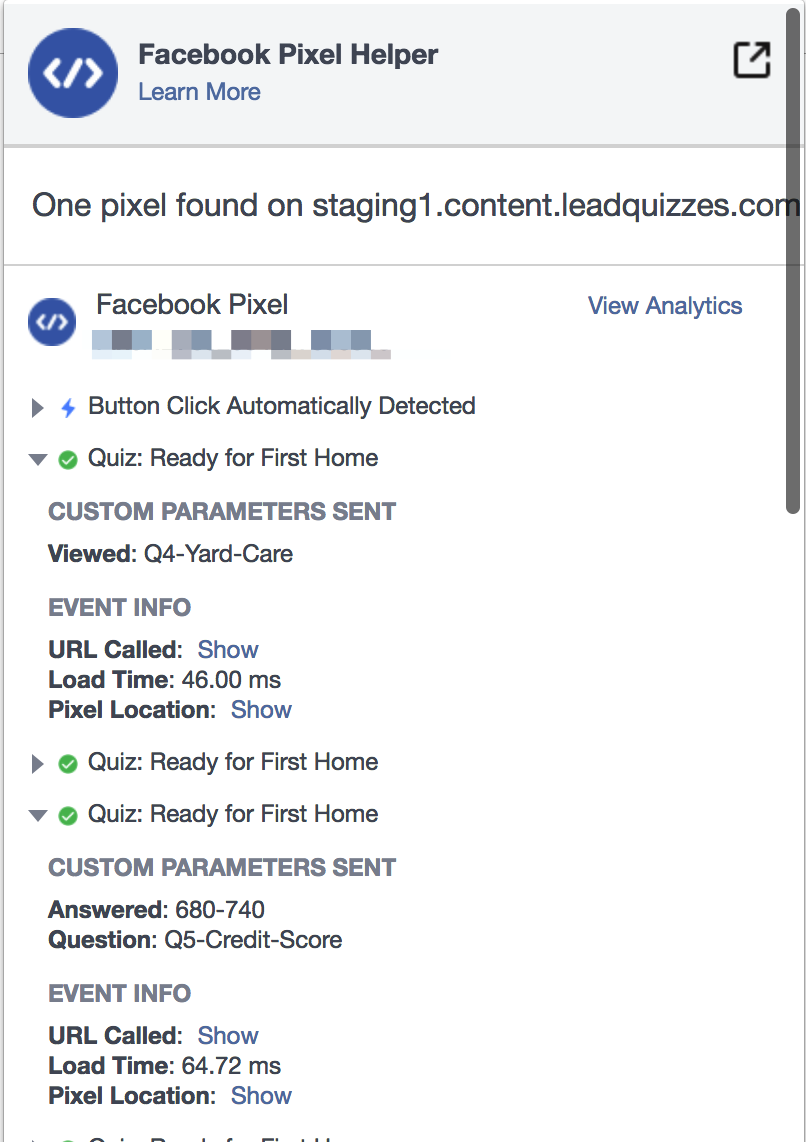
Expanding each event firing will show you the parameter values for the given event.
6. You can also verify that your pixel is working correctly by viewing your event manager dashboard in your Facebook ad account.

Q: Will my Facebook Pixel work even when my LeadQuizzes content is embedded?
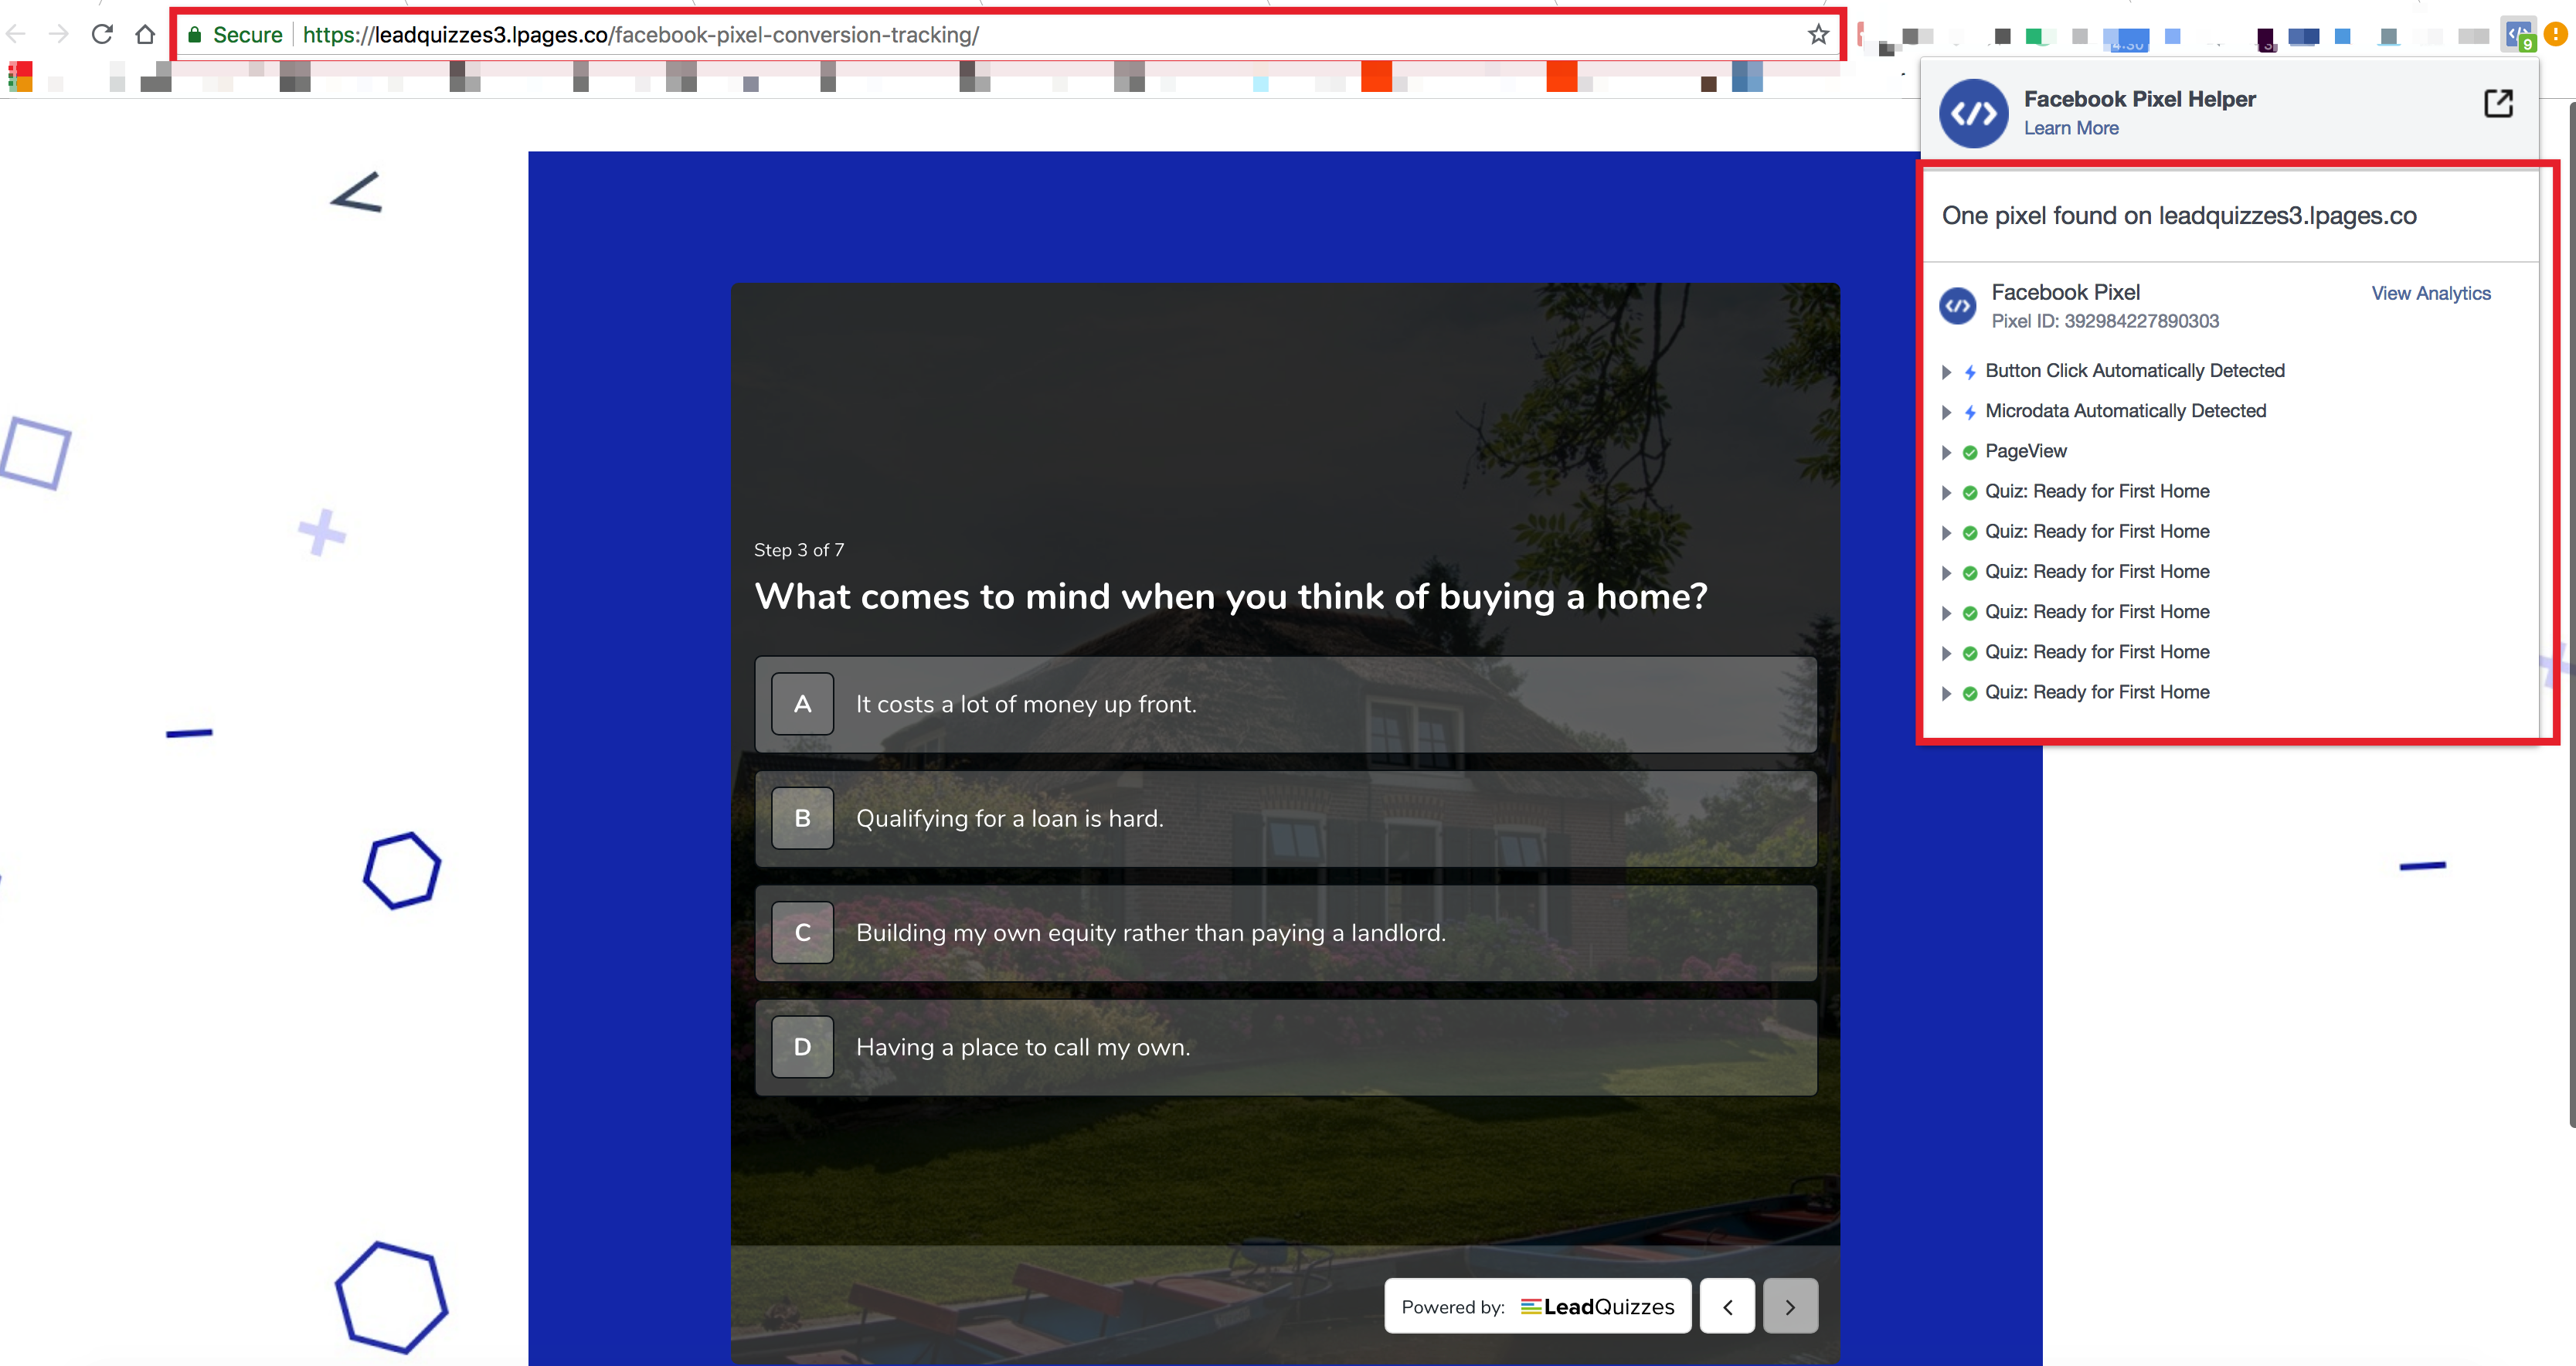
A: Your Facebook Pixel will work even when you have your LeadQuizzes content embed on your website. You can use the Facebook Pixel helper chrome extension to verify it. Make sure you do not have a popup blocker/privacy extension installed on your browser. This can prevent the Facebook Pixel from firing correctly.
Part 5: Creating conversion tracking
Now that you have everything setup & verified, you can start creating Facebook conversions.
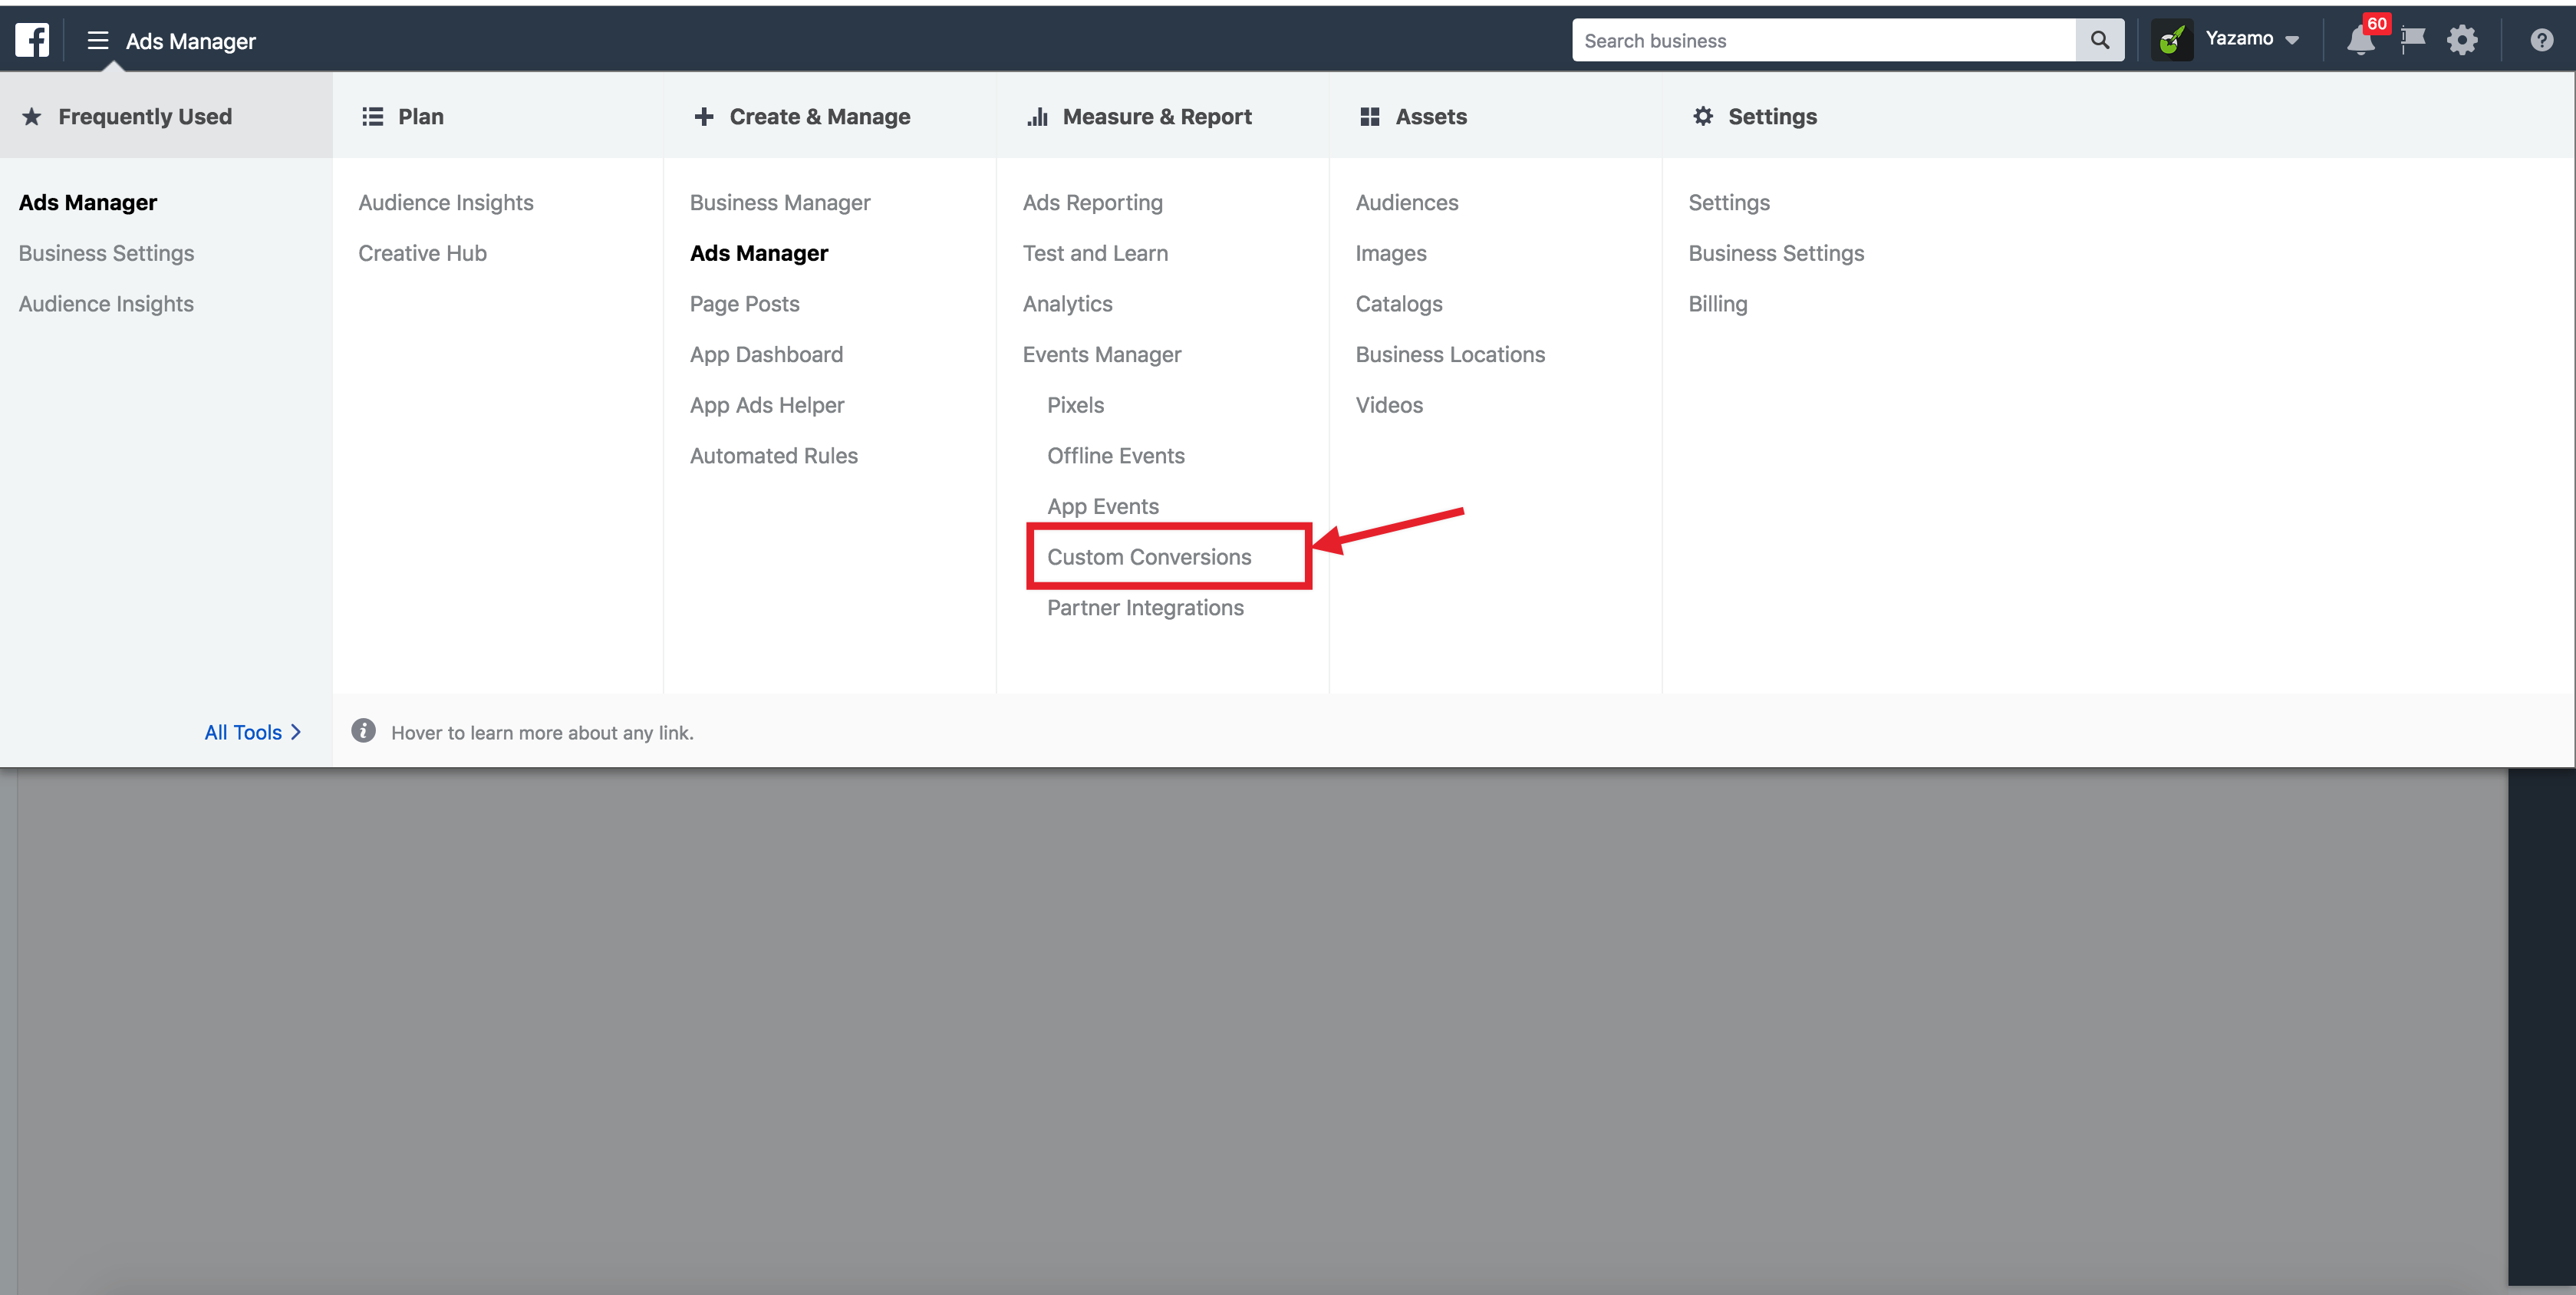
1. Log in to your Facebook Ads Manager and click "Custom Conversions" from your Ads Manager menu.
2. If this your first time setting up Facebook custom conversions. You will see the page titled "Get Started with Custom Conversions". Click the button "Create custom conversion".
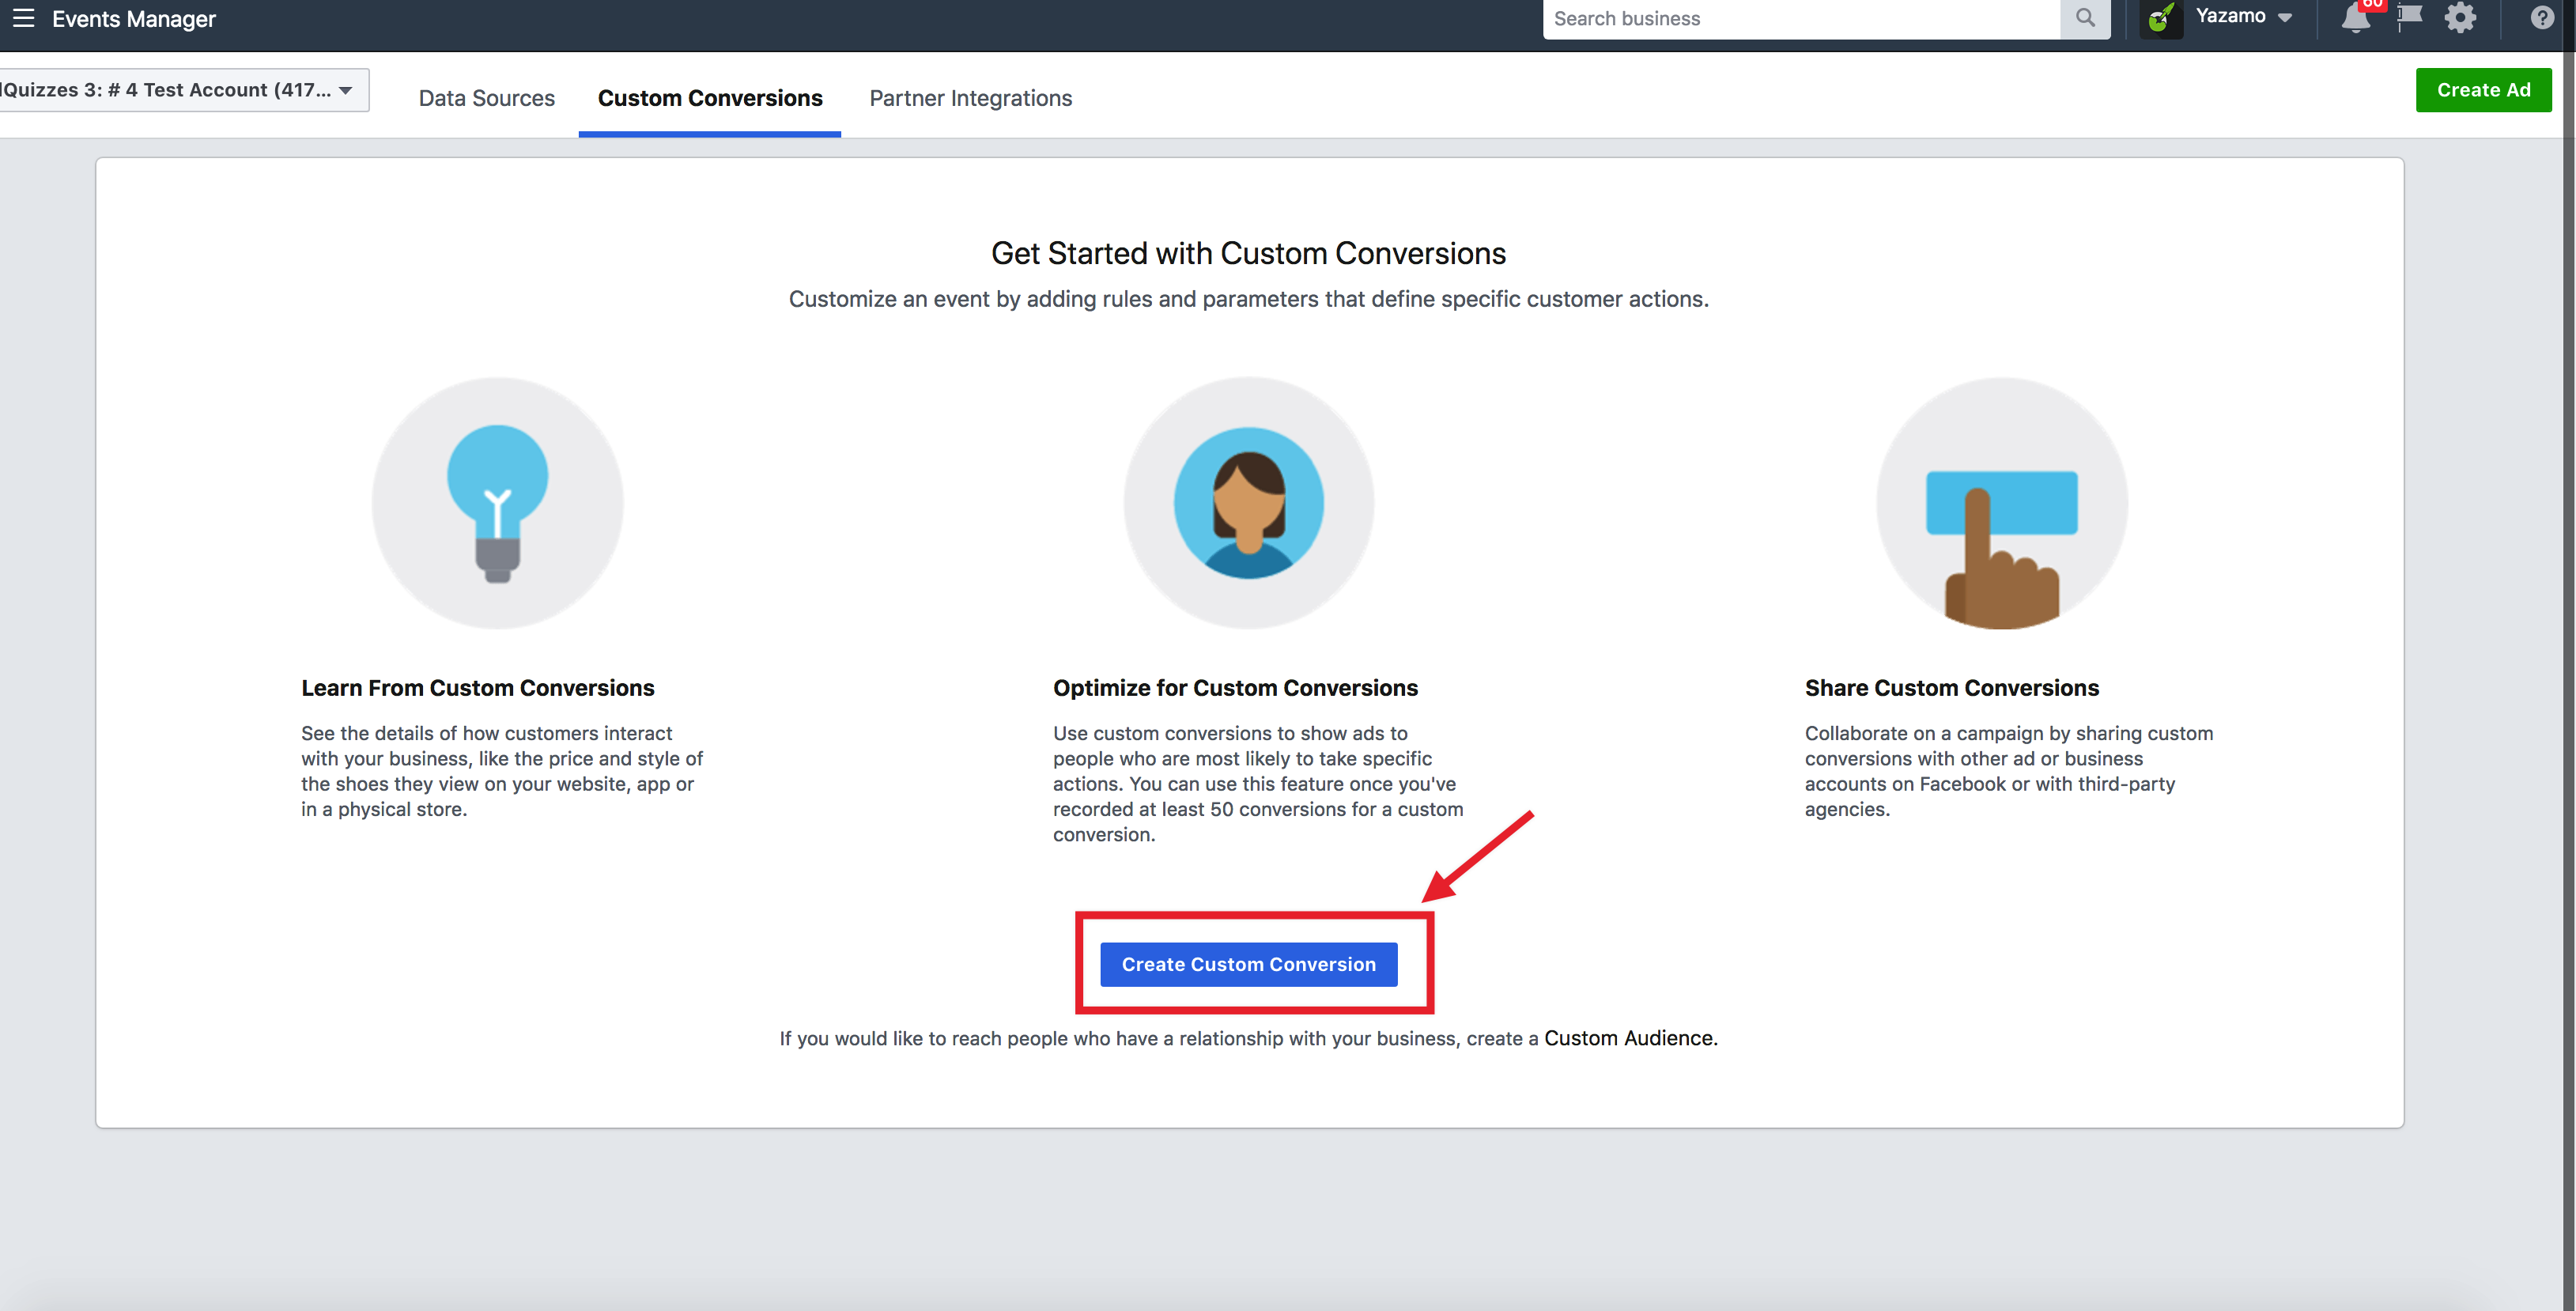
You can also find the button " Create custom conversion" on the top right corner.

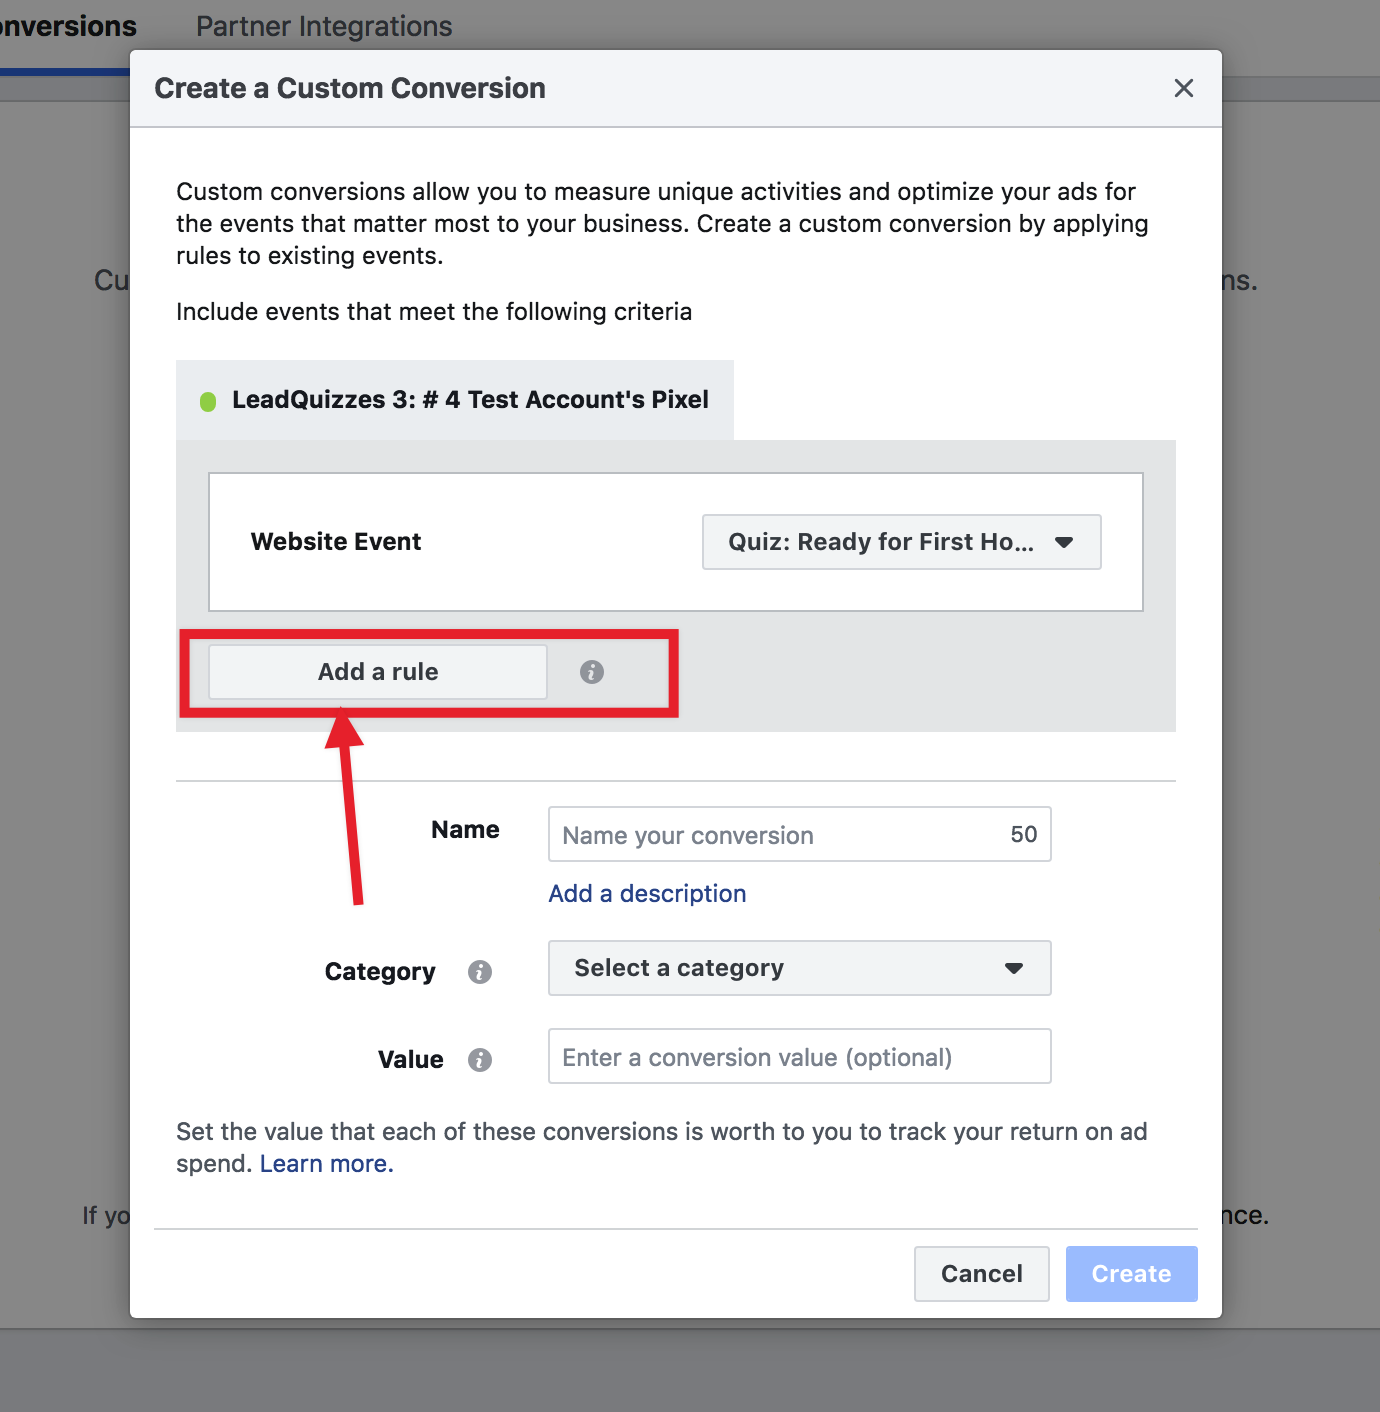
3. A popup titled "Create a Custom Conversion" will appear. This is where you can start configuring your Facebook Custom Conversions.
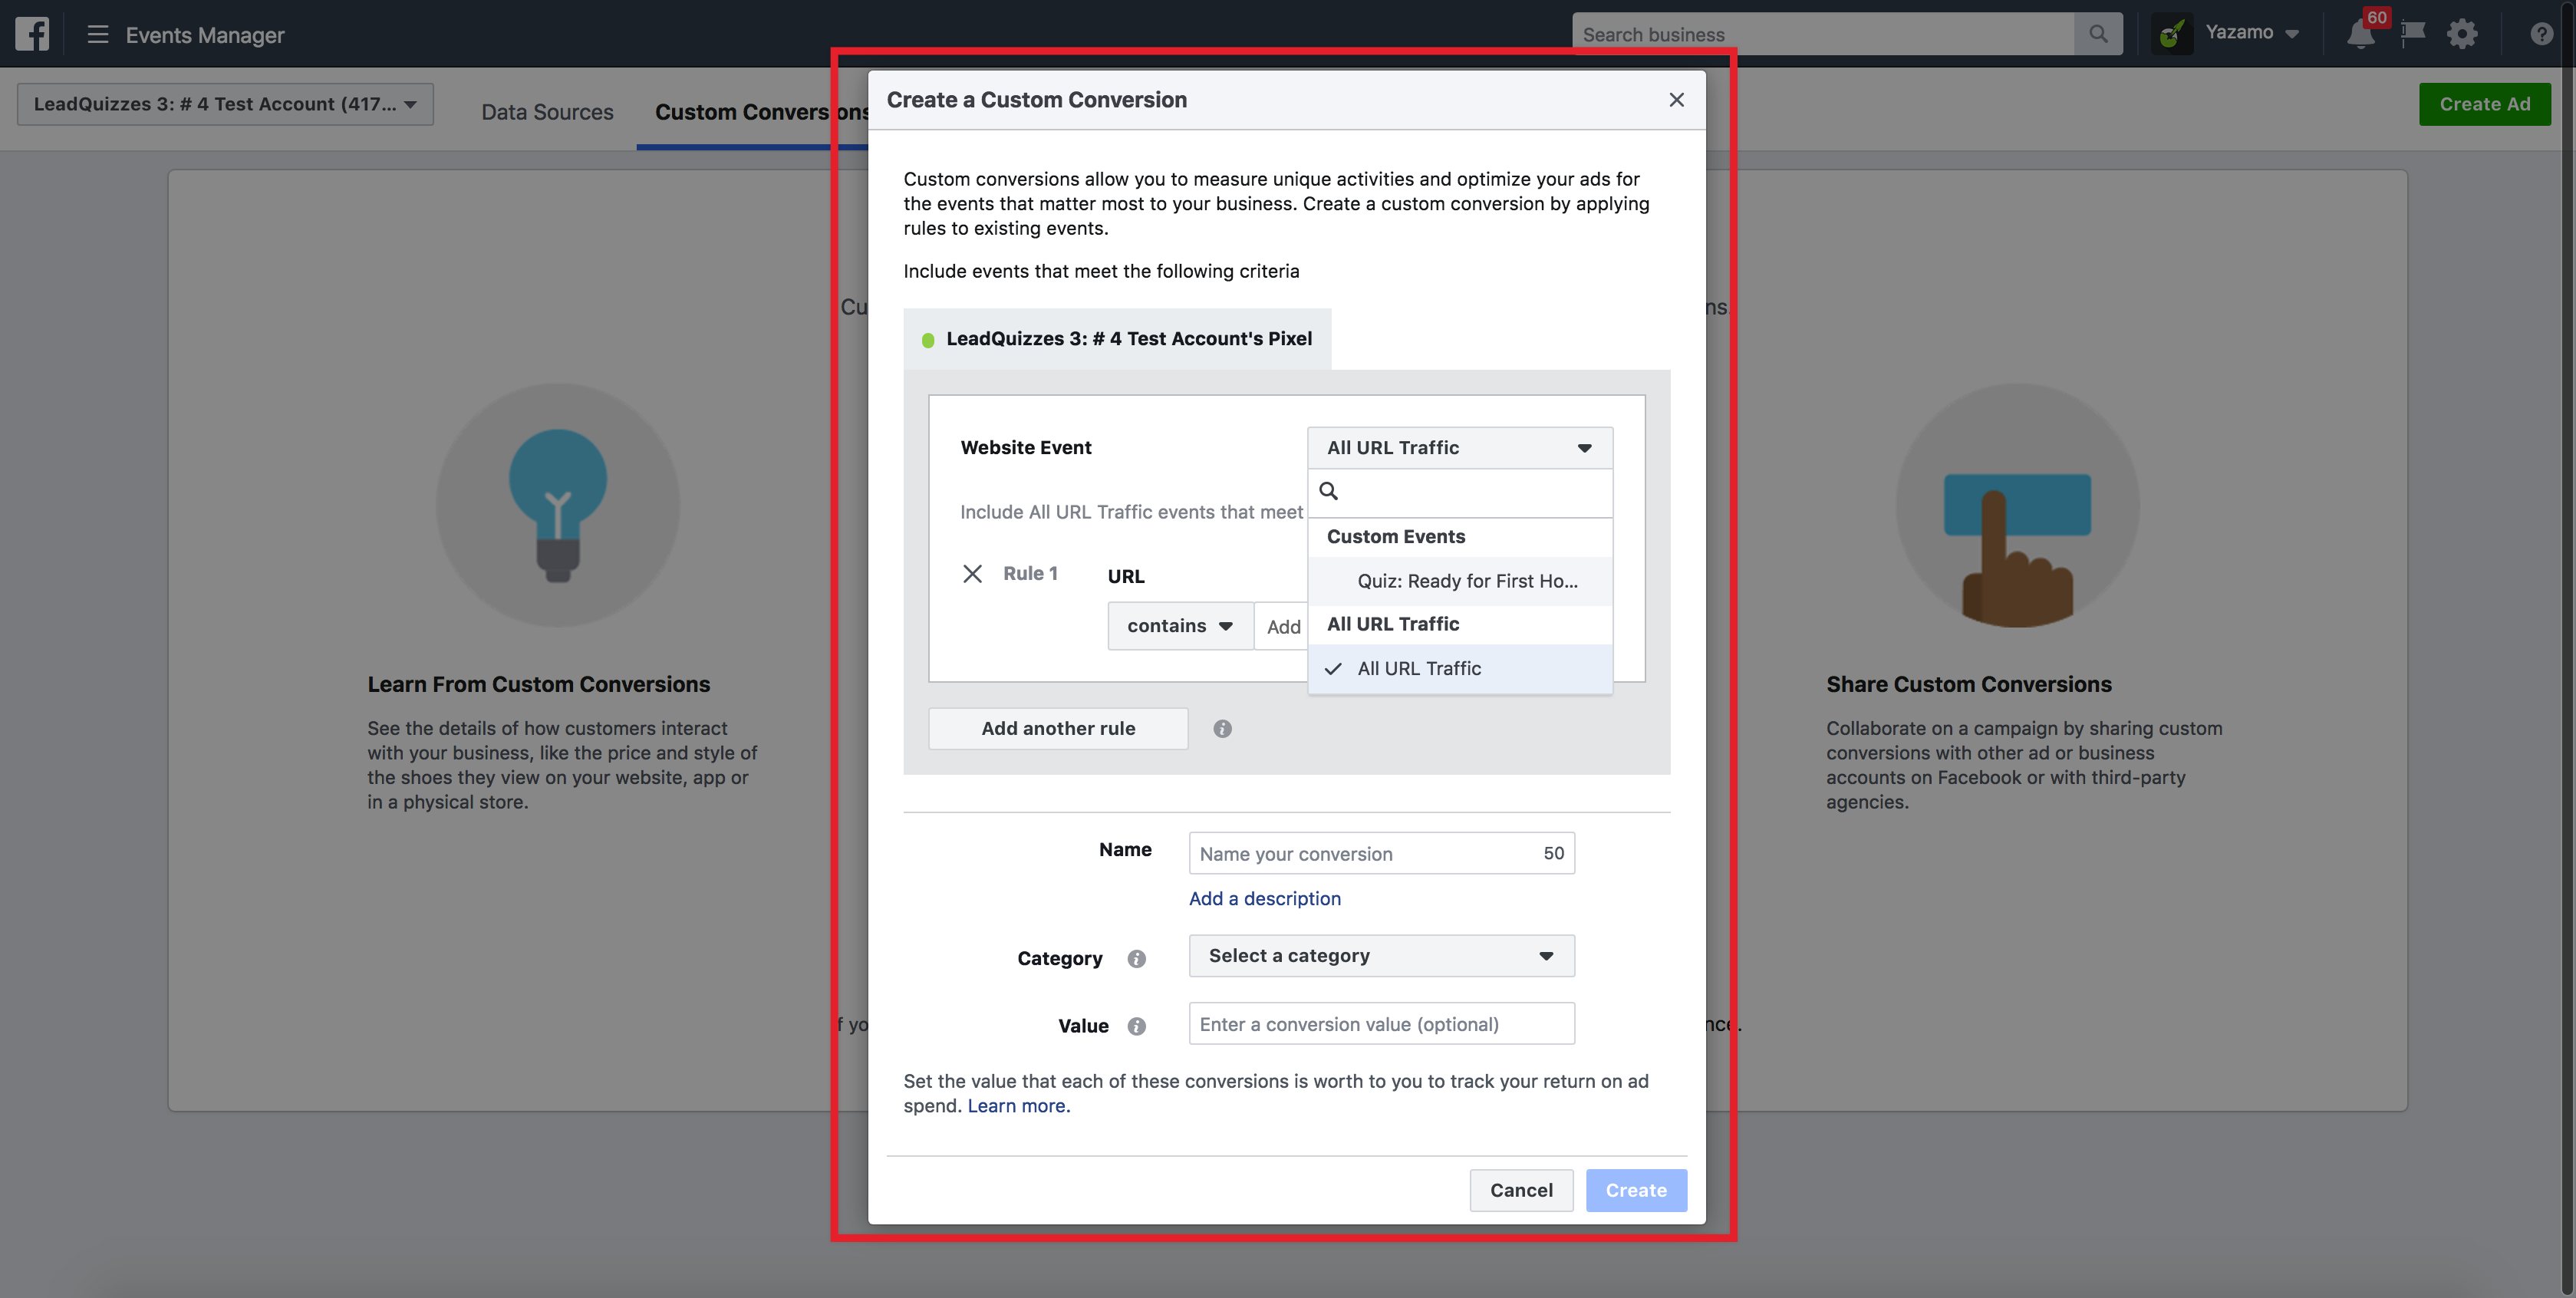
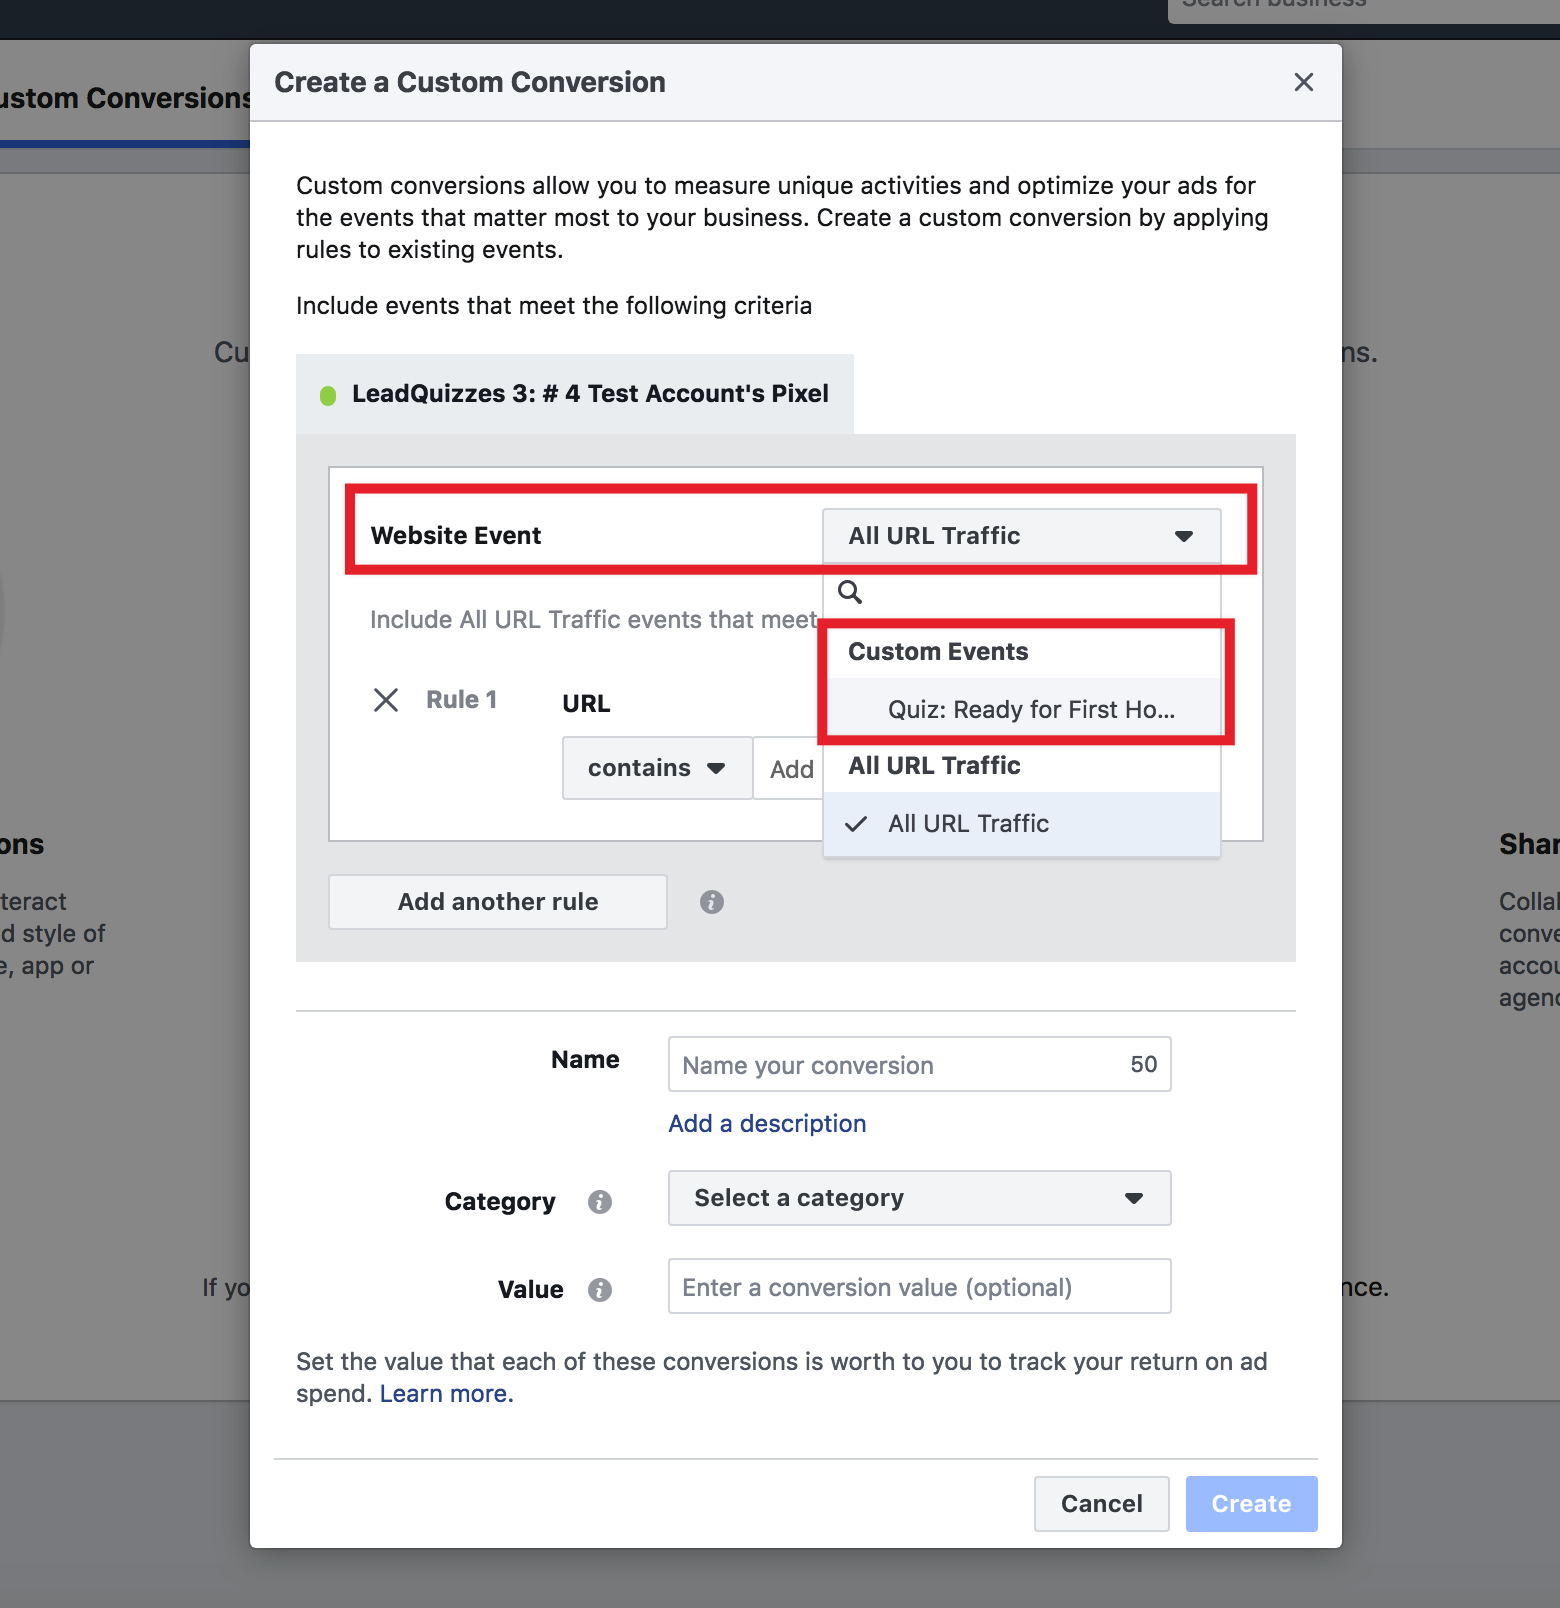
4. Inside of the popup, you will see a label called "Website Event" with a drop-down menu right beside it. Click the drop-down menu & select the LeadQuizzes custom event created for your content in part 3 of this help doc. *Sometimes it can take Facebook up to an hour or two to pull this custom event into this screen.
5. Now that you have a custom event selected, you will need to add a rule to filter down your custom event by parameter value. Click " Add a rule" button.
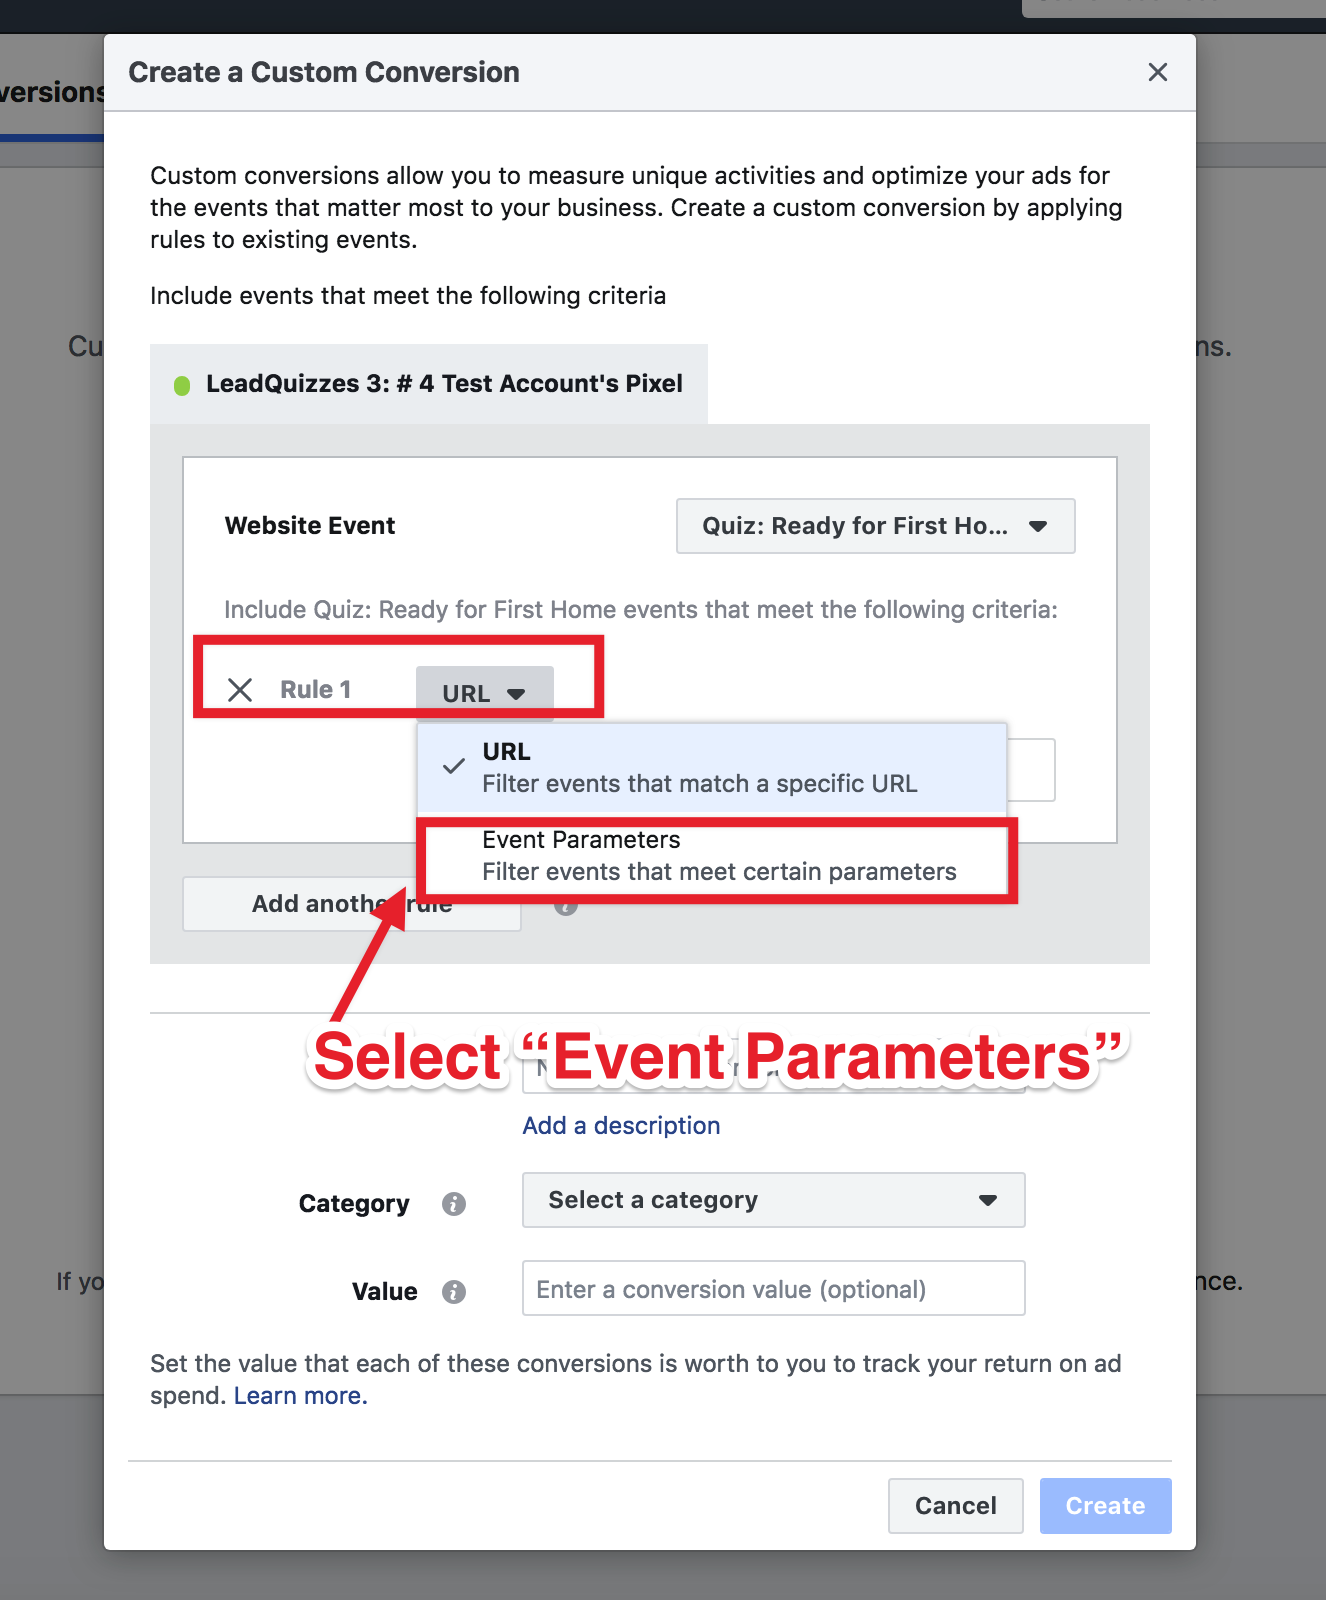
6. You will see a rule drop-down that lets you filter your custom event by parameters. Select "Event Parameters" from the drop-down.
7. Selecting " Event Parameters" will give you another set of drop-downs with LeadQuizzes default parameter names. Check part 3 of this help doc to learn more about LeadQuizzes standard parameter names & values.
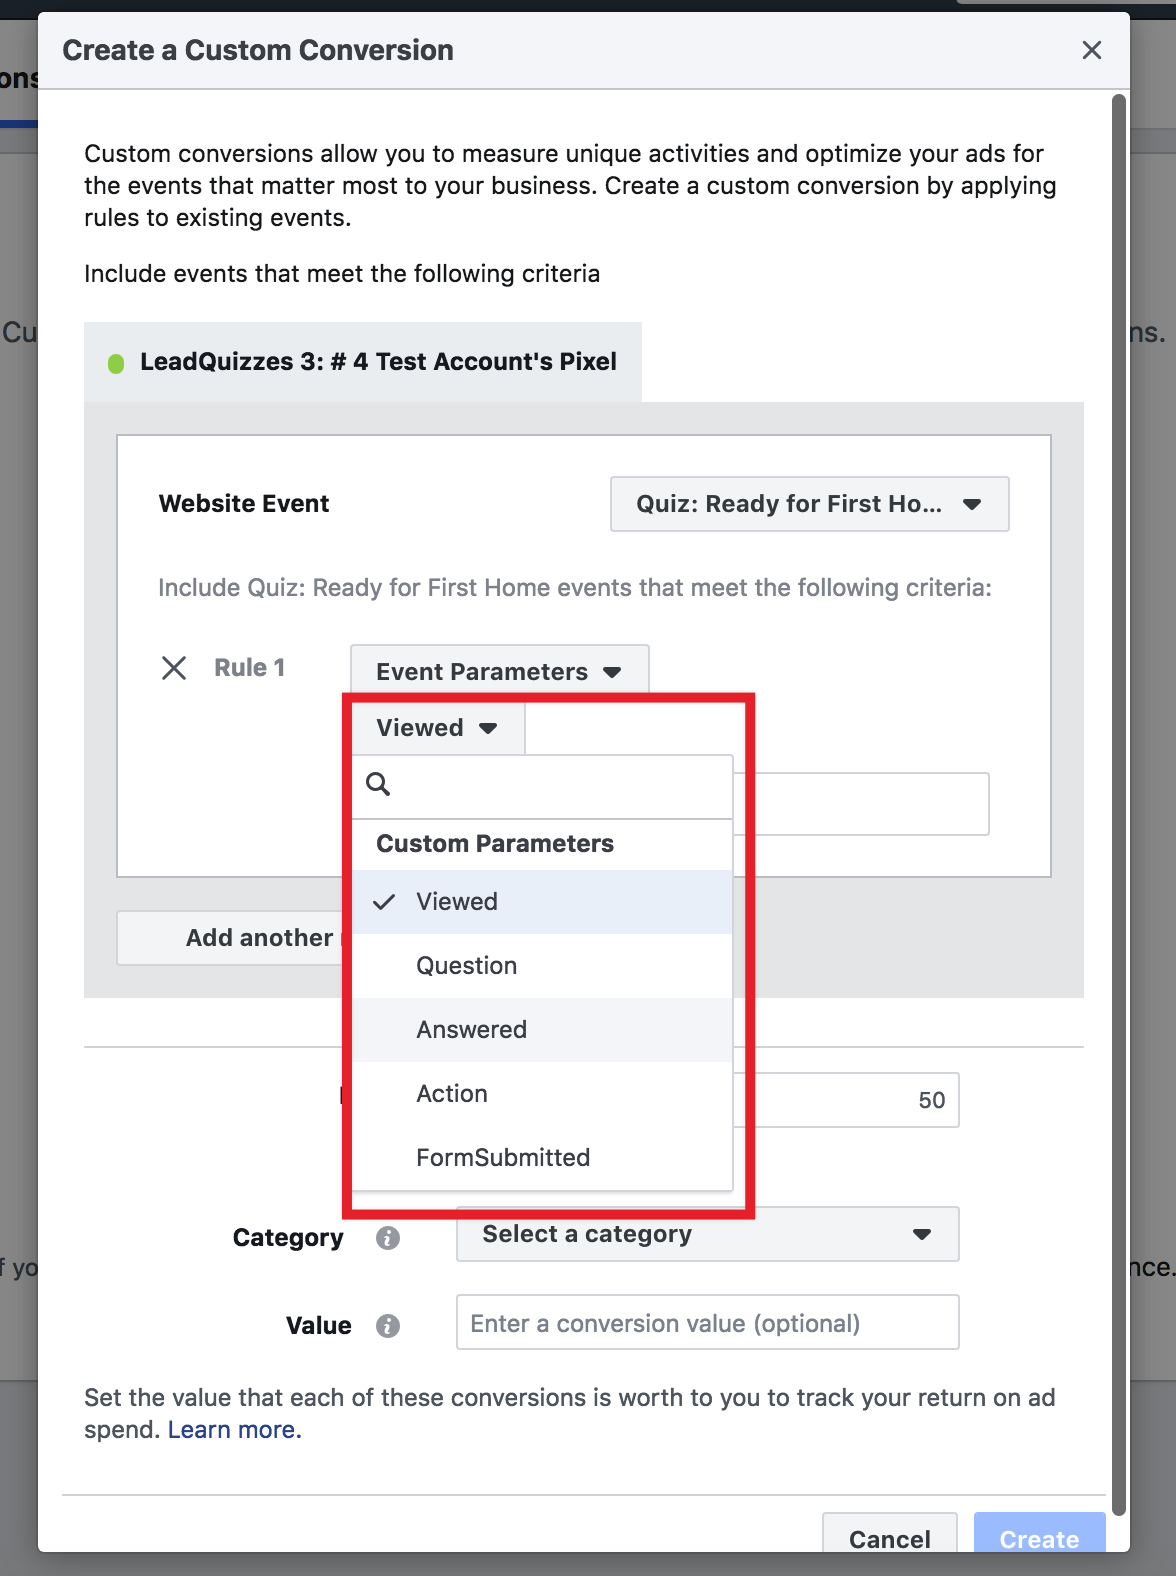
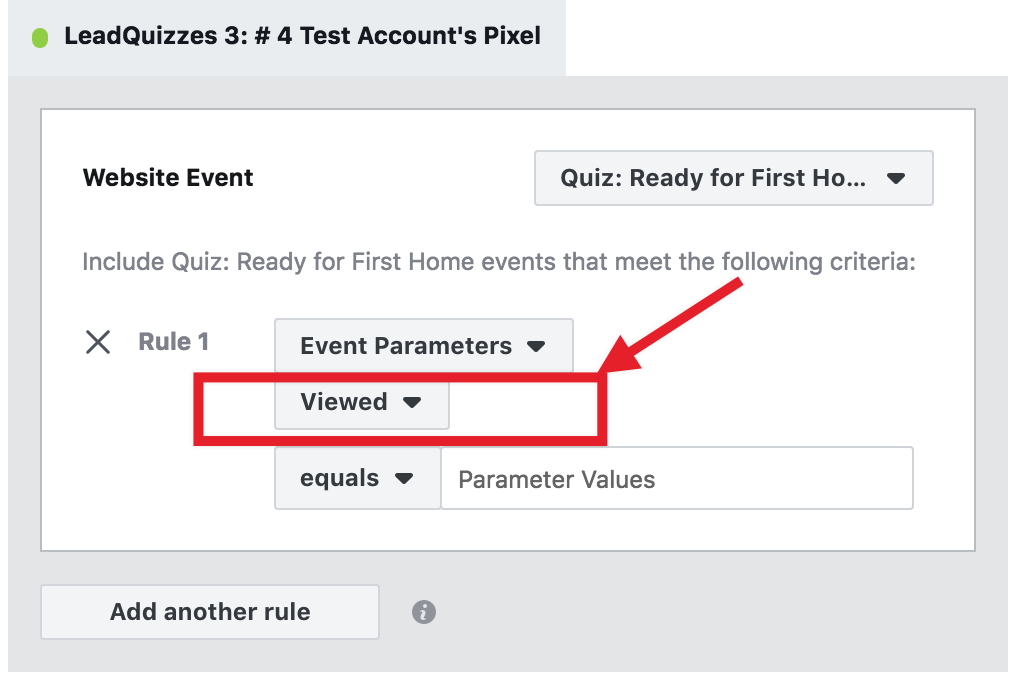
8. Select any of the standard parameter names from the drop-down menu & enter your inputted parameter value from your LeadQuizzes Facebook Configure setting into the input field below. You can enter more than parameter value if you have multiple conversion points. Like for sample, if you have multiple results in your quiz.

Parameter value entered need to be the exact match from your LeadQuizzes Facebook configure settings. This means it also needs to be case sensitive.

Below is an example of what it looks like when a parameter value is entered. In the example below, we are creating a custom conversion when a content taker submits a lead capture form on our quiz. We set the event parameter action to "FormSubmitted" & enter the parameter value "lead" that's entered on our lead capture form.

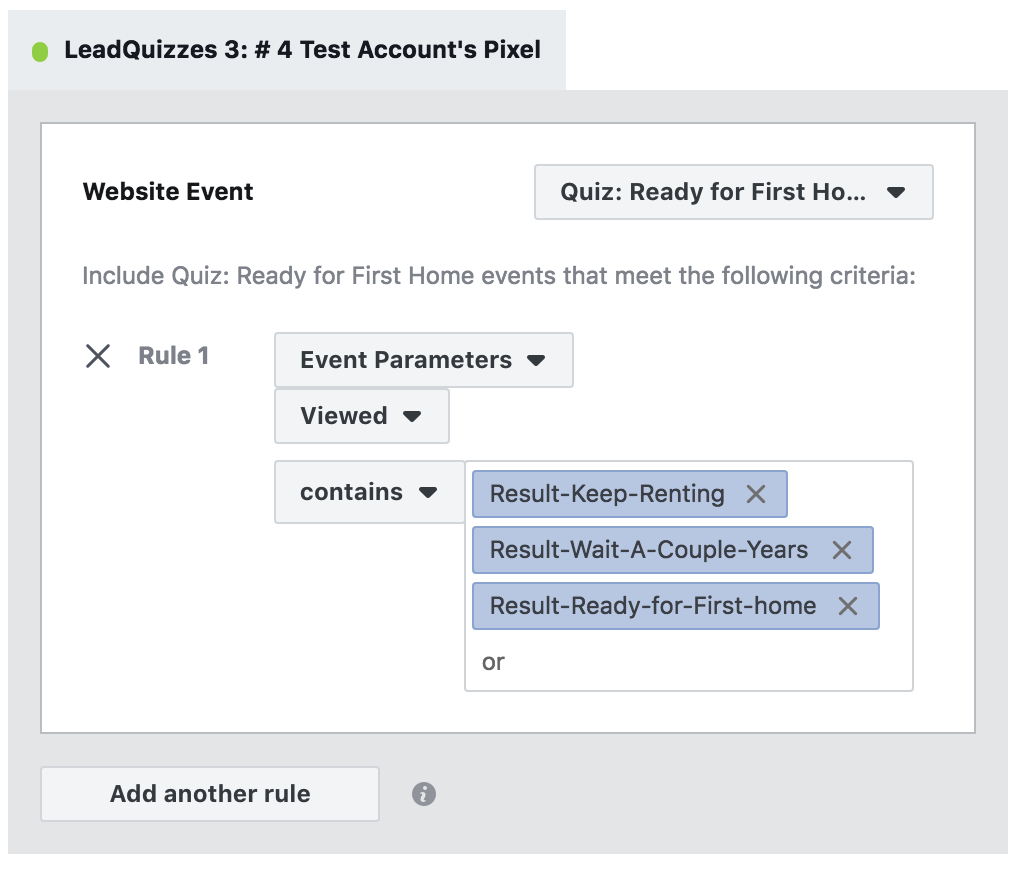
Let's create another custom conversion for when someone receives a result on our quiz. Change events parameter filter from "FormSubmitted" to "Viewed".
Now change "Equals" to "Contains" and copy & paste all your results parameter value from your LeadQuizzes configure settings into the input field.
9. Enter a name for your custom conversion and under category, select an appropriate category for your custom conversion. In most cases, you will pick lead under the category for your custom conversion. You can also choose to set a value for your custom conversion, for example, each lead captured is worth $20 to our business. This allows you to track ROI from your Facebook ad spend. Finally, click "Create" and your custom conversion can now be used in your Facebook ad campaign.

